Showing posts with label crackle. Show all posts

Nail Art Remake: Ice Cream and Candy Nails & Tutorial

Hello dear readers!

This time I decided to do an improved version of a nail art from last year (see it here).

The nail art you see now was what I had in mind originally, but 1yr. ago, I was either too busy or too lazy to do all the steps...
(↓ Tutorial for this nail art below ↓)

1.Once your nails are prepped with a basecoat, start by applying 1 or 2 layers of white nail polish. 
This is only the base for the pastel colors to look nice & bright.
 

2. Apply lines or dots of different pastel colors onto waxed paper, plastic or aluminum foil.

3.Using a nail stamper press it on top of the nail colors, twisting slightly so that the colors mix up a little bit. You will see the colors transferring to the stamper and ready to apply on your nails.
*You can also paint the pastel color lines directly on your nails with your nail polish brush, whichever is easier for you.

4. Stamp the colors from the stamper onto each nail.(Or paint each color with a nail polish brush). Let it dry.
Don't worry if it doesn't look perfect, it doesn't have to be ;)
My nails look like Easter eggs :D
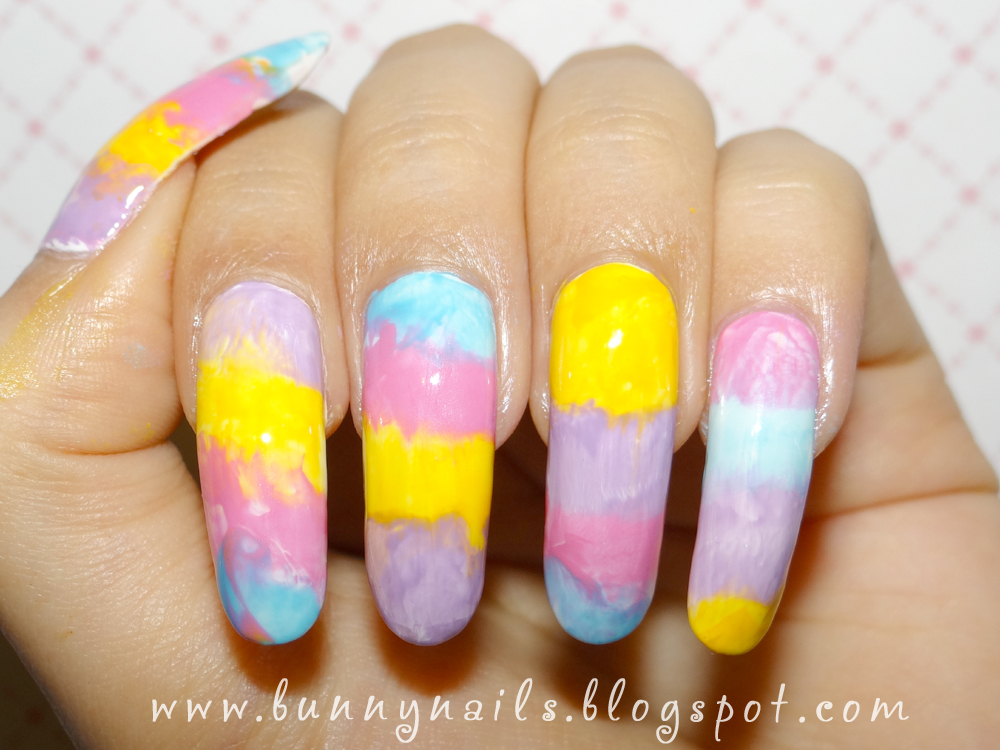
5. Apply one coat of white crackle nail polish and let it dry to get the cracking effect. Apply clear topcoat to smooth out the nail surface and let dry.

6. I used Konad's Q1 stamping plate and stamped the candy designs on my nails using Kleancolor black. You can use any other stamp plate design of your choice.
*There are other options for this nail art such as applying nail art stickers or by drawing freehand designs on your nails ;)

I hope you like this nail art tutorial and that it can be useful to you ;)
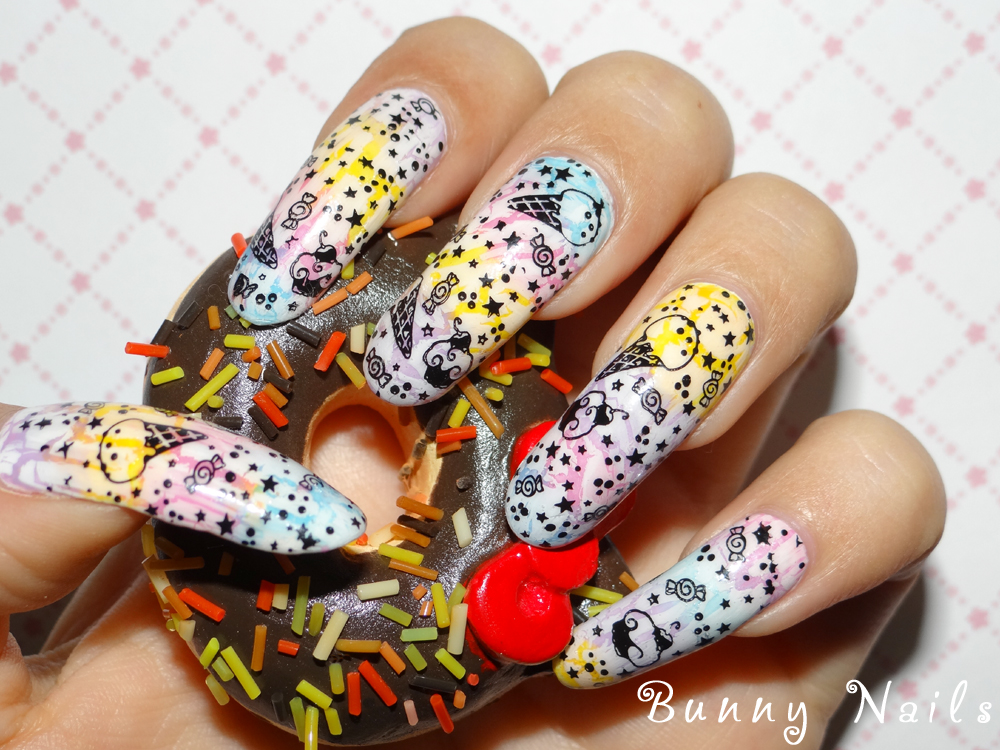

Which version do you like better? Last year's or this one?
♥♥Thank you so much for reading♥♥

Silver and Gold Meteor Shower Nail Art

Hello!

I want to show you some more "Meteor Shower" nail art I did on two sets of false nails.
Click here for the tutorial if you would like to see how I did this on my natural nails.

Here is the silver version:
More details below.
 (Pictures can be enlarged)
  For the silver meteor shower I used:
-1 coat of China Glaze "Millenium"
-Nabi Crackle nail polish in "Black"
-Love & Beauty holographic glitter top coat.
-Various shapes of silver glitter.

Here is the gold version:
 For the gold meteor shower I used:
-Kleancolor "Metallic Yellow"
-Nabi Crackle nail polish in "Black"
-No brand - gold holographic glitter top coat.
-Various shapes of gold glitter.

What do you think about this nail art? Which one was your favorite silver or gold?
♥Thank you for reading♥

Meteor Shower Nail Art Tutorial

Hello again!

Today I want to show you a very simple nail art that I called "Meteor Shower" for the insane (in a good way, of course) amount of glitters that I put on my nails. This is also a tutorial because you will see all the steps for this nail art look.

 Pictures can be enlarged

1. Paint your nails with a metallic/chrome or holographic silver or gold nail polish.
In this case, I used China Glaze GR8 from the OMG collection.

2. Apply a black crackle nail polish and let it dry.

3. Apply a clear top coat that is not fast dry, this is important for the next step.

4. Use chunky glitters in gold or silver color, the more variety the better.
As you can see, I have big hexagon, circle, star, hollow star and small hexagon glitters.

5. While the clear top coat is still wet, apply the glitters randomly or in order and add the quantity you like. 
I always start with the big hexagons then apply the stars and circle glitter and finish with the small hexagon glitter.

6. Apply the glitters to all of your nails.
(Can you see the glittery mess in the background of the picture?)

7. Apply 1-2 layers of  clear topcoat to make sure the texture is not rough.
I applied a coat of Gelous topcoat, let it dry a little bit and added Out the Door fast dry topcoat
(any thick consistency clear topcoat + a fast dry topcoat will do the trick)

Anecdote: The day after I did this nail art I went shopping and I saw a mom and daughter whispering to each other and looking at me. I thought they were saying something bad about me, so I walked away from them. Then, the mom stopped me and asked "Who did your nails?" I said "I did them" She was very surprised when I said that these were my natural nails. Maybe she thought that I was wearing acrylics? Is that good or bad? :)

What do you think about this nail art?

Thank you so much for reading! Your comments are always welcome  ♥

Nabi Crackle Swatches

Hello dear readers! And welcome new readers!

First of all, if you are a previous reader of my blog, you may have noticed that my blog has a new image. I want to say thanks to Nailed it. for designing the banner of my blog. I never imagined it would be this cool!

Some of you may  remember a previous post about my Super Nail Polish Haul in which I got 12 Nabi crackle polishes. I absolutely love these crackles! That is the reason I swatched each color. More pictures below...

(Pictures can be enlarged)
I knew these nail color wheels would come in handy!

1. Nabi Crack "Rose" over Maybelline "Pink Sombrero"
2. Nabi Crack "Mocha" over China Glaze "Sunset Sail"
3. Nabi Crack "White" over Kleancolor "Black"

4. Nabi Crack "Pastel Blue" over Ulta "Smoke Screen"
5. Nabi Crack "New Lilac" over Essie "Nice is Nice"
6. Nabi Crack "Sky Blue" over Rimmel "Pink Punk"

7. Nabi Crack "Sand" over Kleancolor "Dark Brown"
8. Nabi Crack "Bright Purple" over Essie "French Affair"
9. Nabi Crack "Angel Lavender" over Prestige "White"

10. Nabi Crack "Black" over Kleancolor "Metallic Green"
11. Nabi Crack "Silver" over Kleancolor "Black"
12. Nabi Crack "Yellow" over Nabi "Neon Blue"

13. Nabi Crack "Yellow" over Prestige "White"

I decided to dedicate a post to these crackles because this really crack, I have used the Cherimoya crackle and those cracked but not as good as the Nabi ones. Overall, I'm satisfied with all these colors except silver because it did not cracked as good, and yellow because it is sheer over dark colors as you can see in nail 12 but it looks fine in nail 13 over a white base.

What do you think of my swatches?

Follow my blog with Bloglovin

Super Nail Polish Haul

Hi! Today I will post about the nail polish haul that I got yesterday at the flea market. I called it a super nail polish haul because it is the first time I bought this many nail polishes at once. Since I got them at a very good price, I don't feel bad about it :)

The nail polish brands I bought from were Kleancolor, Nabi and Prestige...

First, take a look at this picture (from my crappy cellphone camera) I took of one of the stands I bought some nail polish from. Ever since I started my nail polish addiction, I love going to flea markets in search of pretty and affordable nail polish. Every time I find stands like these, I look like a child in a candy store ; ) So many colors and glitters...

I got 12 crackle nail polishes from Nabi, these are just some of the colors, they carry 40+ colors of crackle. I must say I'm impressed by the range of colors and the quality of these crackles. I try will to post swatches later. (Names from left to right: Sky blue, sand, new lilac, pastel blue, angel lavender, rose, mocha, white, black, yellow, silver, bright purple)

I also bought a bunch of Kleancolor glitter nail polishes. (Names from left to right: Gold caviar, go bunny!, black out, starry night, grand finale, firework)

More glitter kleancolors... (Names from left to right: Red hot, golden nirvana, green with envy, starry blue, chunky copper, tiara gold)

I finally found Chunky holo black from kleancolor. Why so many bottles? Well, because I will include these as prizes for my upcoming giveaway! My camera did not do justice to chunky holo -_-' I assure you these look gorgeous in person ;)

Last but not least, some cream polishes from Prestige and Kleancolor. This are very opaque and some of these can double as stamping nail polishes.
(Names from left to right: 8, 12, mauve, bumble bee, neon white, black)

I hope you enjoyed this post!