Showing posts with label nail stamp. Show all posts

Halloween Night

Hello dear readers!

This is my last Halloween nail art of the year. I did 4 different manicures in total which is an improvement because I usually only did 1 manicure on previous years. This manicure is originally my bf's idea. He wanted to do all the nail polishing and stamping himself but then got frustrated by my huge nail polish stash. From what he told me about his idea, this is what I came up with:

I started with LVX nail polish in Legendaire as the base. I stamped a grunge splatter pattern from HD-C plate using Sally Hansen Insta-dri in Lively Lilac. I stamped all the small designs using HD C and D plates including a tree design from last year's collection.

I used Nabi in black for stamping. on some designs I used the decal technique to do a reverse stamping. 

Here's the stamping on my thumb.

I hope you liked this nail art ;)
♥♥Thank you for reading♥♥

Happy Halloween!


Halloween Nail Art: Zombie Mayhem

Hello dear readers!

I'm trying to come up with more Halloween nail art... I think the idea of doing one on each hand has helped me accomplish  that...

This time, I bring to you a zombie inspired manicure...

(All pictures can be enlarged)
For this nail art, I started with Sun Kissed by Cameo Colours as the base. It is a thermal nail polish which is orange-beige when cold and lime green when temperature turns warm... perfect zombie color combination.
I used  Halloween stamping plates HD C and D for the designs.
Here's what I did on the thumb, blood splatter as the background and a bunch of zombie hands.
I used Sally Hansen Insta-dri in Cinna-snap as the stamping polish for all the blood you see on this manicure.
This is how the manicure looks under cold temperature. The eyes, brains and axe were stamped using the decal technique.
Here you can see the eyes and brains in more detail.

Here are some of the stamping decals that I used on my nails.

What do you think of this manicure? 
♥♥Thank you for reading♥♥


Cute Ghosts and Pumpkins Halloween Nail Stamping

Hello dear readers!

I'm trying to make Halloween manicures as much as I can to give you some nail art ideas. I usually keep my nail art for 2 weeks, which is a long time. This is the reason I decided to do a different nail art for my left and right hand. On my left hand, I did the skeleton mani I showed you last post. Now, on my right hand, I wanted something more cute.

I think this is the1st time I ever show my right hand since I always use it for taking pictures :D
(All pictures can be enlarged)

For this manicure, I started with Revlon Enthrall as the base. and I stamped holographic nail polish on my nails to give a touch of shimmer and dimension to the nail art. I used my HD-C plate for the cute ghosts, candies and "Trick or Treat" lettering. For the spiky vines and pumpkins, I used the HD-D plate. 
I used Sally Hansen Insta-Dri nail polishes: Brisk Blue, Lickety-split Lime, Lightening, Lively Lilac, Mint Sprint, Presto Pink and Snappy Sorbet for stamping as well as Konad White for the ghosts.

Here are my hands with both Halloween manicures

And here is my right thumb with the stamped holographic spiderwebs

What do you think of this Halloween manicure? 
Is it a good idea to wear 2 different manicures at the same time? :D

♥♥Thank you for reading♥♥

Halloween Skeleton Nail Stamping

Hello, dear readers!

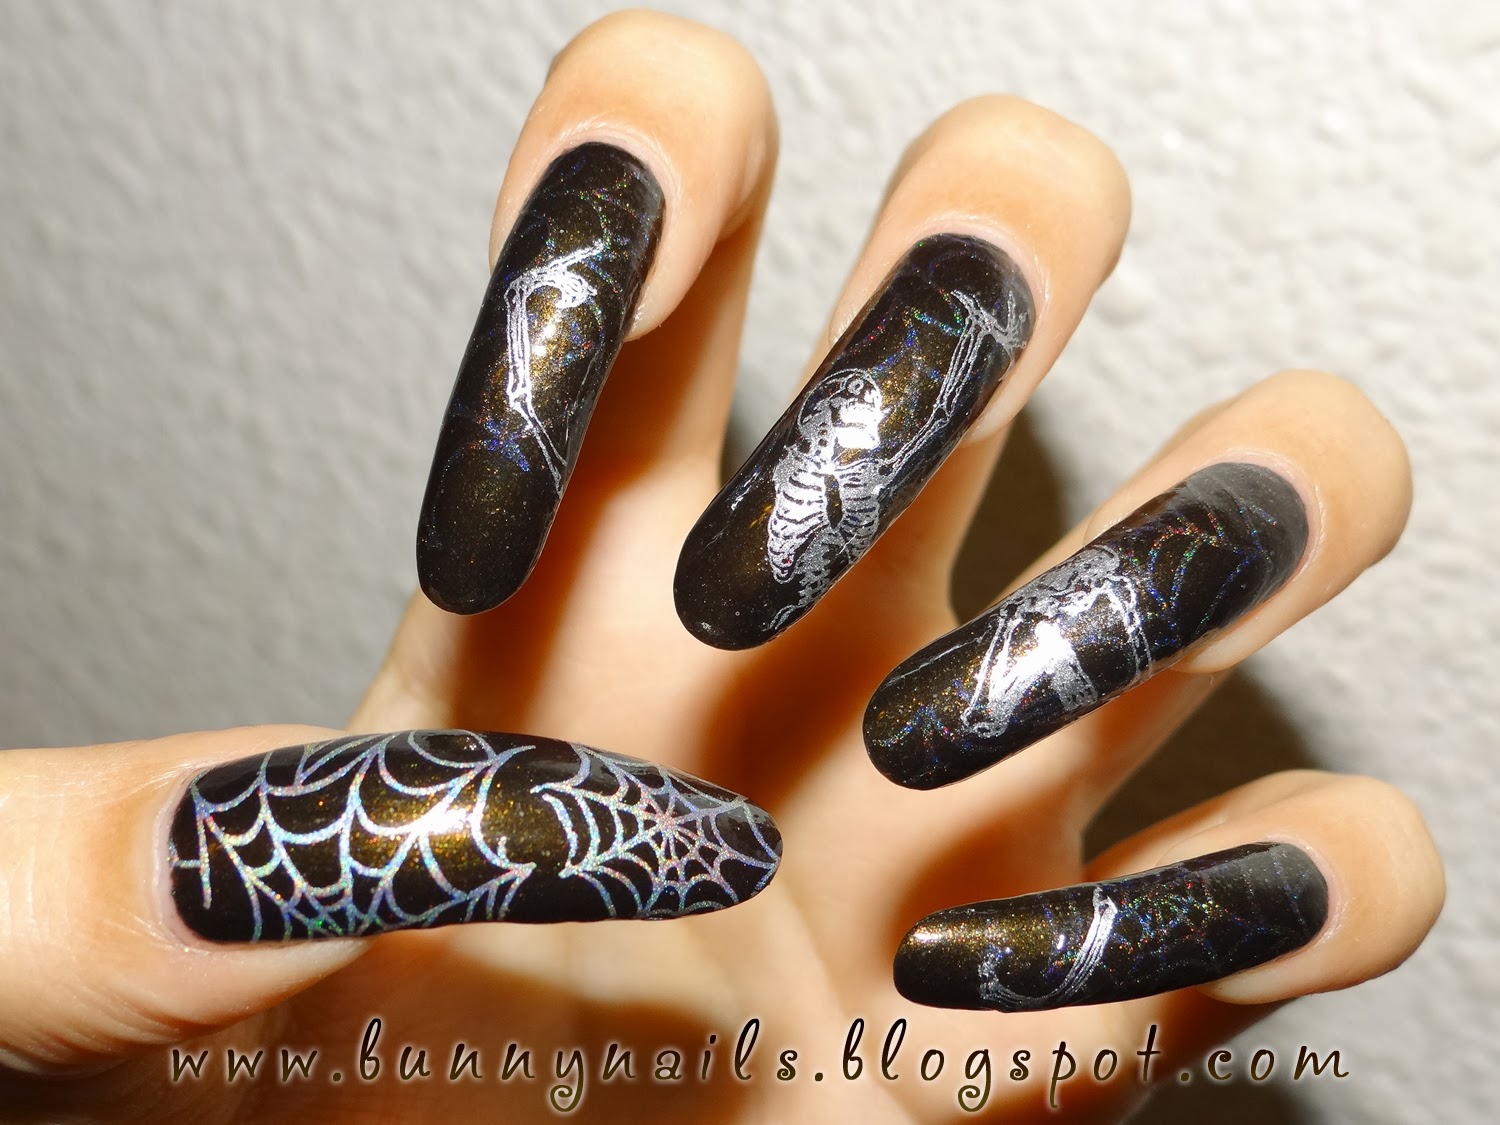
As you may have read on my previous post. I released new HD stamping plates with Halloween and Día de muertos designs. Now that they are on my hands, I put HD-C plate to the test and did a manicure with it.


(All pictures can be enlarged)

I started out by using Revlon - Enthrall as the base for this manicure.

I stamped the spiderweb pattern on the thumb using a holographic stamping nail polish that I made myself with Spectraflair pigment. On the other nails, the spiderwebs look more subtle because I used a holographic topcoat instead to give a hint of shimmery spiderwebs. I stamped the dancing skeleton image with Sally Hansen - Silver Sweep. I used the stamping decal technique to have more control of the placement of the design across my 4 nails. I just transferred the design onto the stamper, added clear topcoat, let dry and cut/applied the skeleton in parts.

A close-up pic on the spiderweb design on my thumb nail.
(Can you see the holographic effect?)

What do you think of this manicure?
(You can purchase HD C and D plates here)

♥♥Thank you so much for reading♥♥

New HD Nail Stamping Plates: Halloween and Día de Muertos

Hello dear readers!

For nail stamp fanatics out there, here are my new HD plates.
Plates HD-C & HD-D are the continuation of my holiday series, this time, featuring designs for Halloween and Día de muertos.
(Image can be enlarged)
Plates are available and ready to ship now!
You can purchase through my online store: www.bunnynails.ecrater.com or directly through this link: http://bunnynails.ecrater.com/c/1638963/hd-holiday-series-nail-art
The price for each plate is 16.99 USD and free worldwide shipping on these plates.
The size of the plates is 14.5cmx9.5cm and the full nail patterns measure 2.5cmx2cm. All patterns and designs are sized to fit on both, short or long nails. 

***You can also watch this awesome video review of the plates by Lacquer or Leave Her!


 ♥♥Thank you so much for reading♥♥

Challenge: Tone-on-Tone Stamping

Hello dear readers!

I did another manicure for FB group AiS. For Sunday September 1st, the theme of the challenge was tone-on tone which was pretty easy. I chose gray tones for this manicure because it's one of my favorite colors that I rarely get to wear.


I started with China Glaze - Pelican Grey as the base...

Then, I applied a layer of Spectraflair topcoat.
After that, I stamped a full nail design from plate XL M using Kleancolor - Charcoal for stamping.
(Kleancolor Charcoal doesn't work as a nail polish at all, takes ages to dry or slides off your nail...other than that... for stamping, it works flawlessly) ;)
Extra pic :)


 What do you think of this nail art?
As always...
♥♥Thank you so much for reading♥♥

How to do Nail Stamp Decals

Hello dear readers!

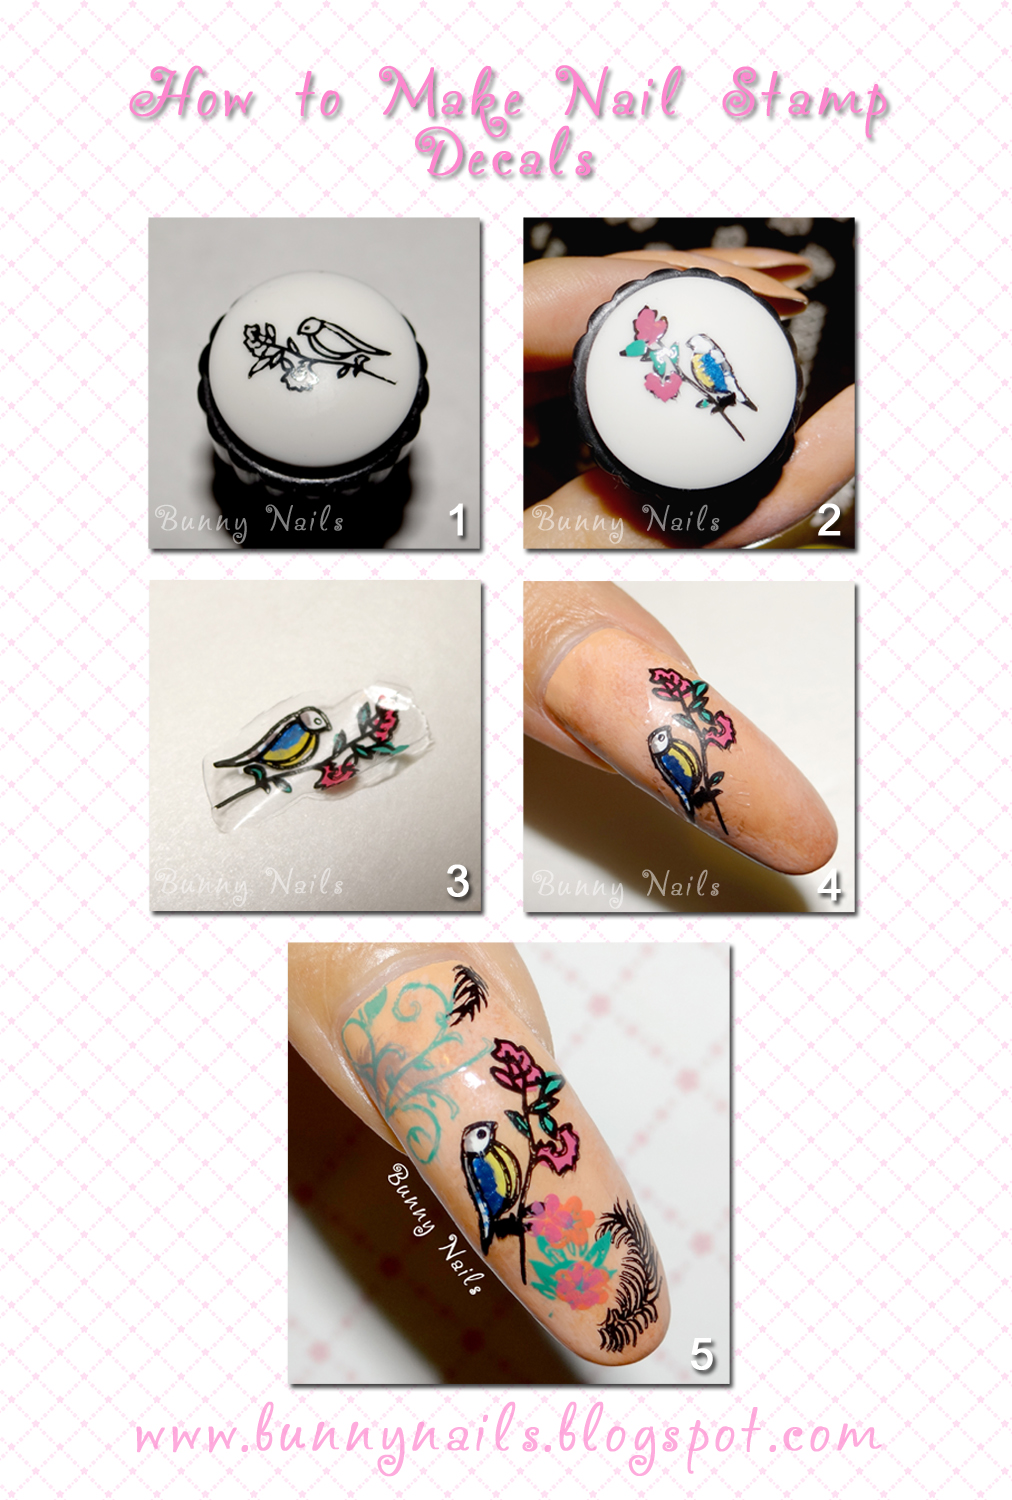
As I promised, here is the tutorial on how to make nail decals by using designs from nail art plates.
 
I will describe all the steps below the image.
Step1: Transfer your favorite image onto a nail stamper of your choice. I used a small soft stamper and  a bird design from Stamping plate XL M using Nabi black as my stamping nail polish.

Step2: With the design still on the stamper, paint inside the image using a small brush or with your nail polish brush. Nail polish or acrylic colors can be used. Let dry. *Cover the design using a clear topcoat and let dry. I used Out the Door fast dry top coat. it makes this process much faster ;)

Step3: Once the design is dry, peel off using tweezers (or in this case, my own nails).

Step4: Apply clear topcoat on your nail color base. This step is important so that the surface is sticky enough for the decal to stick on your nail. *Make sure to let dry the topcoat a little bit before applying the decal, it should be dry to the touch but a little bit sticky. Place the decal on your nail and smooth it out carefully to get rid of creases or air bubbles.

Step5: Apply clear topcoat to protect and give shine to your decal. You can add other details before applying topcoat.

I hope this tutorial will be useful to you and that you now will be able to try this nail art ;) 
If you have any questions, let me know by leaving a comment :)

♥♥Thank you so much for reading♥♥

Challenge: Stamping Over a Nude Base

Hello dear readers!

Last Sunday's challenge on FB group Adventures in Stamping was to do some stamping nail art on a nude base. I find this group very fun because it stimulates my creativity when I have no inspiration.

Well, here's what I came up with:
More details below....

The base color for this nail art was Palm Springs by American Apparel. Then I did some sponging using other lighter and darker nude tones to give more dimension to the background of my design.

For stamping polishes, I used:
-Sally Hansen Insta-Dri - Mint Sprint (leaves and foliage)
-Sally Hansen Insta-Dri - Presto Pink (Flowers)
-Sally Hansen Insta-Dri - Snappy Sorbet (Flowers on thumb)
-Pop Beauty - Thirty Seven Foggy (Light grey foliage)
-Nabi - Black (Feathers)
For designs, I used:
-XL R plate (Bird on thumb, flowers, big feathers)
-XL F plate (Small flowers, leaves on thumb)
-XL M plate (Big flowers and foliage on ring finger)
-QA23 (Vines on thumb and pinkie)
-A49 (Flowers and leaves on  index)
-m77 (Small feathers and flowers on pinkie)


Here's a detailed picture of what I did on my thumbnail using the stamping decal technique
*I will do a tutorial on this next week

 What do you think of this nail art?
Stay tuned for my tutorial on how to do a nail decal using a stamping design next Monday ;)

♥♥Thank you so much for reading♥♥

Tiger Print Nail Art

Hello dear readers!

This time I just did a simple tiger print on my nails... I'm not into animal prints... but I used a gold nail polish that was calling for something wild and I thought, why not?


I started with a nail polish by Icing called Golden Rule.
It is a gold color with foil finish and holographic micro glitter.
*You can see a 15 sec. video swatch of this nail polish here.

I stamped the tiger print with Kleancolor black using stamping plate QA25 
(Available for purchase in my online store)

As I said previously, looks a bit too wild for my taste especially on this nail lenght... Rawr!! But it's always good to try something different...

What do you think of this design? Too wild? :)
♥♥Thank you for reading♥♥


Nail Art Remake: Ice Cream and Candy Nails & Tutorial

Hello dear readers!

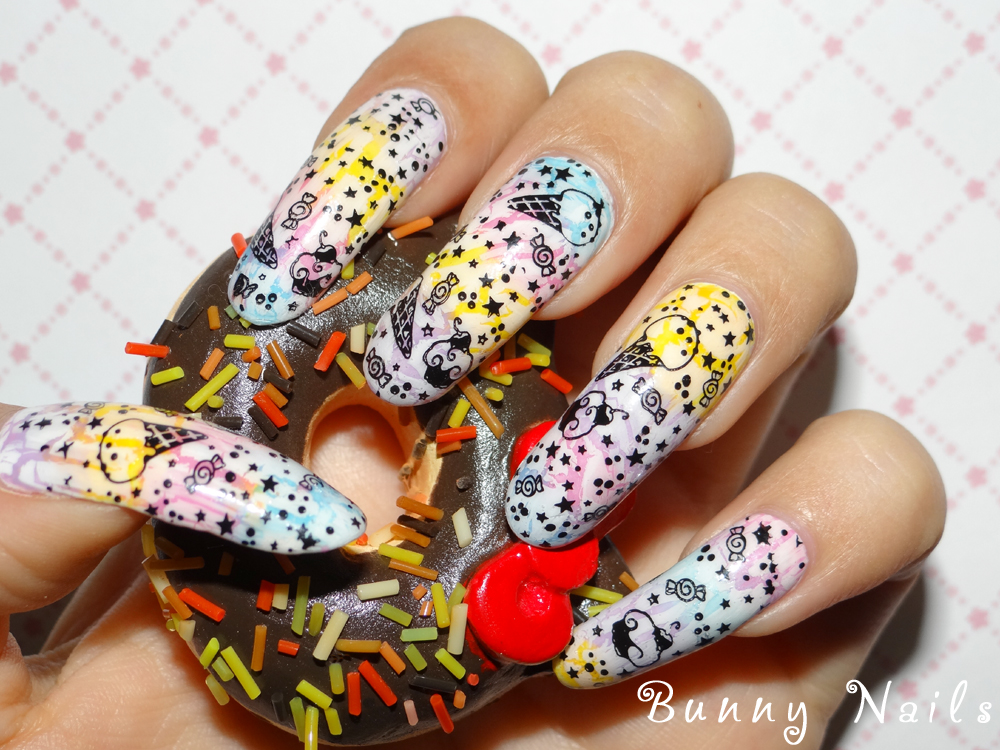
This time I decided to do an improved version of a nail art from last year (see it here).

The nail art you see now was what I had in mind originally, but 1yr. ago, I was either too busy or too lazy to do all the steps...
(↓ Tutorial for this nail art below ↓)

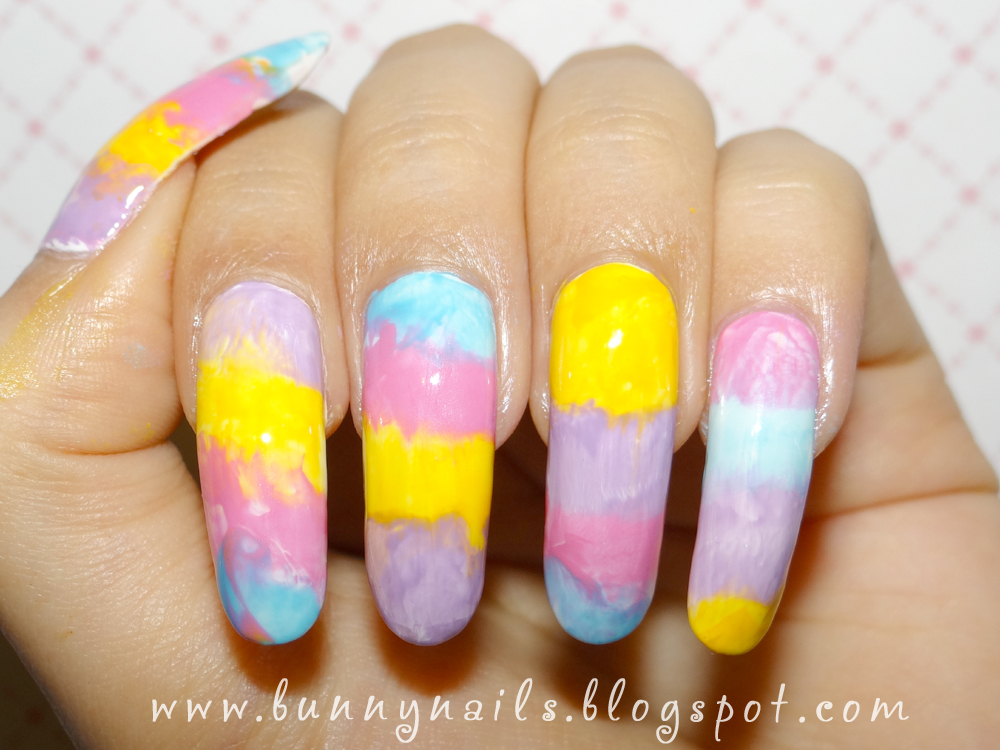
1.Once your nails are prepped with a basecoat, start by applying 1 or 2 layers of white nail polish. 
This is only the base for the pastel colors to look nice & bright.
 

2. Apply lines or dots of different pastel colors onto waxed paper, plastic or aluminum foil.

3.Using a nail stamper press it on top of the nail colors, twisting slightly so that the colors mix up a little bit. You will see the colors transferring to the stamper and ready to apply on your nails.
*You can also paint the pastel color lines directly on your nails with your nail polish brush, whichever is easier for you.

4. Stamp the colors from the stamper onto each nail.(Or paint each color with a nail polish brush). Let it dry.
Don't worry if it doesn't look perfect, it doesn't have to be ;)
My nails look like Easter eggs :D

5. Apply one coat of white crackle nail polish and let it dry to get the cracking effect. Apply clear topcoat to smooth out the nail surface and let dry.

6. I used Konad's Q1 stamping plate and stamped the candy designs on my nails using Kleancolor black. You can use any other stamp plate design of your choice.
*There are other options for this nail art such as applying nail art stickers or by drawing freehand designs on your nails ;)

I hope you like this nail art tutorial and that it can be useful to you ;)


Which version do you like better? Last year's or this one?
♥♥Thank you so much for reading♥♥

Holographic Skittle Manicure and Stamping

Hello dear readers!

This is my first post after my painful thumbnail breakage... as you can see, I managed to keep some length.

It's been months since I purchased my Color Club Halo Hues collection and still they were sitting unused in a dark corner of my nail polish drawer. This time I thought it was a good idea to put 5 of them to good use and do a skittle manicure.
 

The Color Club colors that I used are as pictured on the pic below from left to right:
 Cosmic Fate, Over the Moon, Kismet, Eternal Beauty, and Angel Kiss

I stamped a pattern from my Bunny Nails HD-A plate using Kleancolor black.

Both of my hands, can you believe I took this pic myself? :-)

What do you think of my attempt on the skittle manicure?
♥♥Thank you so much for reading♥♥

Sakura Bunny

Hello dear readers!

Easter is a couple days away and I was planning nail art for this occasion. I was thinking about Easter eggs, peeps or chocolate bunnies. When I decided that I wanted to include bunnies into the design, the image of bunnies viewing cherry blossoms was the first thing that came to my mind. The Japanese culture lover that I am could not resist doing another nail art inspired in this beautiful symbol of  Japan

For those who may not know it, 花見 hanami (flower viewing) is a Japanese tradition in which people gather and eat under a cherry blossom tree to observe the ephemeral beauty of sakura. 

(Pictures can be enlarged)
Here's what I used for this nail art:
-Base: OPI Venus di Violet
-Stamping plates: XL O (for background) QA21 (tree branches) and HD A & B (bunnies)
-Stamping nail polishes: Ulta - Grape Escape, Kleancolor - Dark Brown and Verity - White
-Cherry blossom nail stickers
うさぎの花見

Falling in love...


I hope you like this manicure as much as I did ;)

♥♥Thank you so much for reading♥♥

Challenge: Crazy Neons

I'm back again!

As always, I seem to take breaks in between posts. I've received very nice and encouraging emails from long nail lovers... All I have to say is Thank you so much!
I sincerely appreciate every lovely message. I have more manicures and swatches for upcoming posts ;)

This is a belated post that I was supposed to post around Feb. 17th for the Crazy Neons challenge on FB group AIS.

As I told you, this is a manicure from a month ago, as of now, my nails are even longer :p It is getting more and more difficult to stamp a full nail design on my nails...

For this manicure I used:
Base: Barry M Gelly - Grapefruit
Stamping: Kleancolor - Black
Stamping plate: HD B


I hope you like this nail art.
♥♥Thank you so much for reading and for leaving a comment♥♥

Valentines Day: Leopard Heart Print

Hello dear readers and nail friends!

Today I want to show you a simple nail art using a  nail stamp pattern from my HD - B plate.
I always saw  leopard heart print manicures on my favorite Japanese nail art magazines and thought how cute it looked but I have zero patience for drawing every single shape on my long nails :( this was my inspiration for this design.

(All pictures can be enlarged)
For this manicure, I started with two coats of Orly Prelude to a Kiss (such a lovely name). 
I stamped the leopard heart print using Sally Hansen Insta-Dri Cinna- snap 


I hope you like this manicure :)

 ♥Thank you so much for reading and leaving nice comments♥

Happy Valentines Day!

           @@@   @@@       @@@   @@@       @@@   @@@       @@@   @@@
@ @ @ @ @ @ @ @ @ @ @ @ @ @ @ @
\\\\ @ @ @ @ @ @ @ @ @ @ @ @
------@ )---( @-----@ )---( @-----@ )---( @-----@ )---(
@-------->
//// @ @ @ @ @ @ @ @
@ @ @ @ @ @ @ @
@ @ @ @ @ @ @ @
@ @ @ @ @ @ @ @
@ @ @ @