Showing posts with label 2013. Show all posts

China Glaze - When Stars Collide

Hello dear readers!

Today, I'm going to show you swatches of China Glaze - When Stars Collide. I wore this color last month but couldn't post it because I wanted to post Halloween manicures... so here it is.

 When Stars Collide is a maroon color holographic nail polish. It was part of the China Glaze Hologlam collection.

Here you can see the holographic shine. The holo effect is not as strong as on previous collections but I like the subtle metallic finish.

I experienced a bit of difficulty in application such as bald spots and dragging when I applied a 2nd coat. Not too bad but still, not a perfect application.
Here I posted swatches for CG Strap on your Moonboots, another nail polish from the hologlam collection.

What do you think of this nail polish?
♥♥Thank you for reading♥♥

2x1 Día de Muertos Nail Art

Hello dear readers!

Today I will be showing you two different Día de muertos (Day of the dead) nail art in the same post ;)
I wanted to try a more traditional one and a simpler one, but with a similar theme.

More detailed pictures and details below....

As I wrote on my día de muertos post from last year, Nov. 1st (children) and Nov. 2nd (adults) are days for Mexicans to remember our loved ones who are no longer with us. We prepare an altar with elements such as fruits, food, and other elements that are supposed to guide the spirit of our loved one to us and then back to the afterlife.
(A  traditional día de muertos altar)

Now, this theme translated to nail art...

*I added the dead lovers as the center of this nail art as a symbol of love after death. 
Absence does not mean forgetting.
There will always be a very special place in our hearts for those who have gone before us.

For this manicure, I started with China Glaze - Howl you Doin' as the base. Then, I stamped the lover's skeletons, papel picado (cut paper) pattern, crosses and candles from HD C and HD D plates.
I painted the skeletons using the stamping decal technique.
On my thumb, I applied a combination of stamping sugar skulls and added flower stickers for extra decoration.
*In Mexico, calaveras de azúcar (sugar skulls) are given as a treat for this celebration or as part of the altar. When given to a friend or relative, the name of the receiver is usually written on the skulls forehead. 

Now, the 2nd nail art theme is death as part of life itself.
It is a fact that many people don't like to think about because it may sound gruesome or sad.
The day we are born, we have started a journey that will finish with death.

A part of a dancing skeleton stamped on my nail...
The skeleton is probably mocking us, saying "Cómo me ves, te verás"
(The way you see me now, sooner or later you will look like me).
 ----------------------------------

I hope you liked any of these two nail art that I made for this very special post.
I had to take some time to write something meaningful for this day because this festivity is very close to my heart. So, if you took your time to read through this post, I hope you've learned a little bit about día de muertos.

♥♥Thank you for reading♥♥


Halloween Night

Hello dear readers!

This is my last Halloween nail art of the year. I did 4 different manicures in total which is an improvement because I usually only did 1 manicure on previous years. This manicure is originally my bf's idea. He wanted to do all the nail polishing and stamping himself but then got frustrated by my huge nail polish stash. From what he told me about his idea, this is what I came up with:

I started with LVX nail polish in Legendaire as the base. I stamped a grunge splatter pattern from HD-C plate using Sally Hansen Insta-dri in Lively Lilac. I stamped all the small designs using HD C and D plates including a tree design from last year's collection.

I used Nabi in black for stamping. on some designs I used the decal technique to do a reverse stamping. 

Here's the stamping on my thumb.

I hope you liked this nail art ;)
♥♥Thank you for reading♥♥

Happy Halloween!


Halloween Nail Art: Zombie Mayhem

Hello dear readers!

I'm trying to come up with more Halloween nail art... I think the idea of doing one on each hand has helped me accomplish  that...

This time, I bring to you a zombie inspired manicure...

(All pictures can be enlarged)
For this nail art, I started with Sun Kissed by Cameo Colours as the base. It is a thermal nail polish which is orange-beige when cold and lime green when temperature turns warm... perfect zombie color combination.
I used  Halloween stamping plates HD C and D for the designs.
Here's what I did on the thumb, blood splatter as the background and a bunch of zombie hands.
I used Sally Hansen Insta-dri in Cinna-snap as the stamping polish for all the blood you see on this manicure.
This is how the manicure looks under cold temperature. The eyes, brains and axe were stamped using the decal technique.
Here you can see the eyes and brains in more detail.

Here are some of the stamping decals that I used on my nails.

What do you think of this manicure? 
♥♥Thank you for reading♥♥


Cute Ghosts and Pumpkins Halloween Nail Stamping

Hello dear readers!

I'm trying to make Halloween manicures as much as I can to give you some nail art ideas. I usually keep my nail art for 2 weeks, which is a long time. This is the reason I decided to do a different nail art for my left and right hand. On my left hand, I did the skeleton mani I showed you last post. Now, on my right hand, I wanted something more cute.

I think this is the1st time I ever show my right hand since I always use it for taking pictures :D
(All pictures can be enlarged)

For this manicure, I started with Revlon Enthrall as the base. and I stamped holographic nail polish on my nails to give a touch of shimmer and dimension to the nail art. I used my HD-C plate for the cute ghosts, candies and "Trick or Treat" lettering. For the spiky vines and pumpkins, I used the HD-D plate
I used Sally Hansen Insta-Dri nail polishes: Brisk Blue, Lickety-split Lime, Lightening, Lively Lilac, Mint Sprint, Presto Pink and Snappy Sorbet for stamping as well as Konad White for the ghosts.

Here are my hands with both Halloween manicures

And here is my right thumb with the stamped holographic spiderwebs

What do you think of this Halloween manicure? 
Is it a good idea to wear 2 different manicures at the same time? :D

♥♥Thank you for reading♥♥

Halloween Skeleton Nail Stamping

Hello, dear readers!

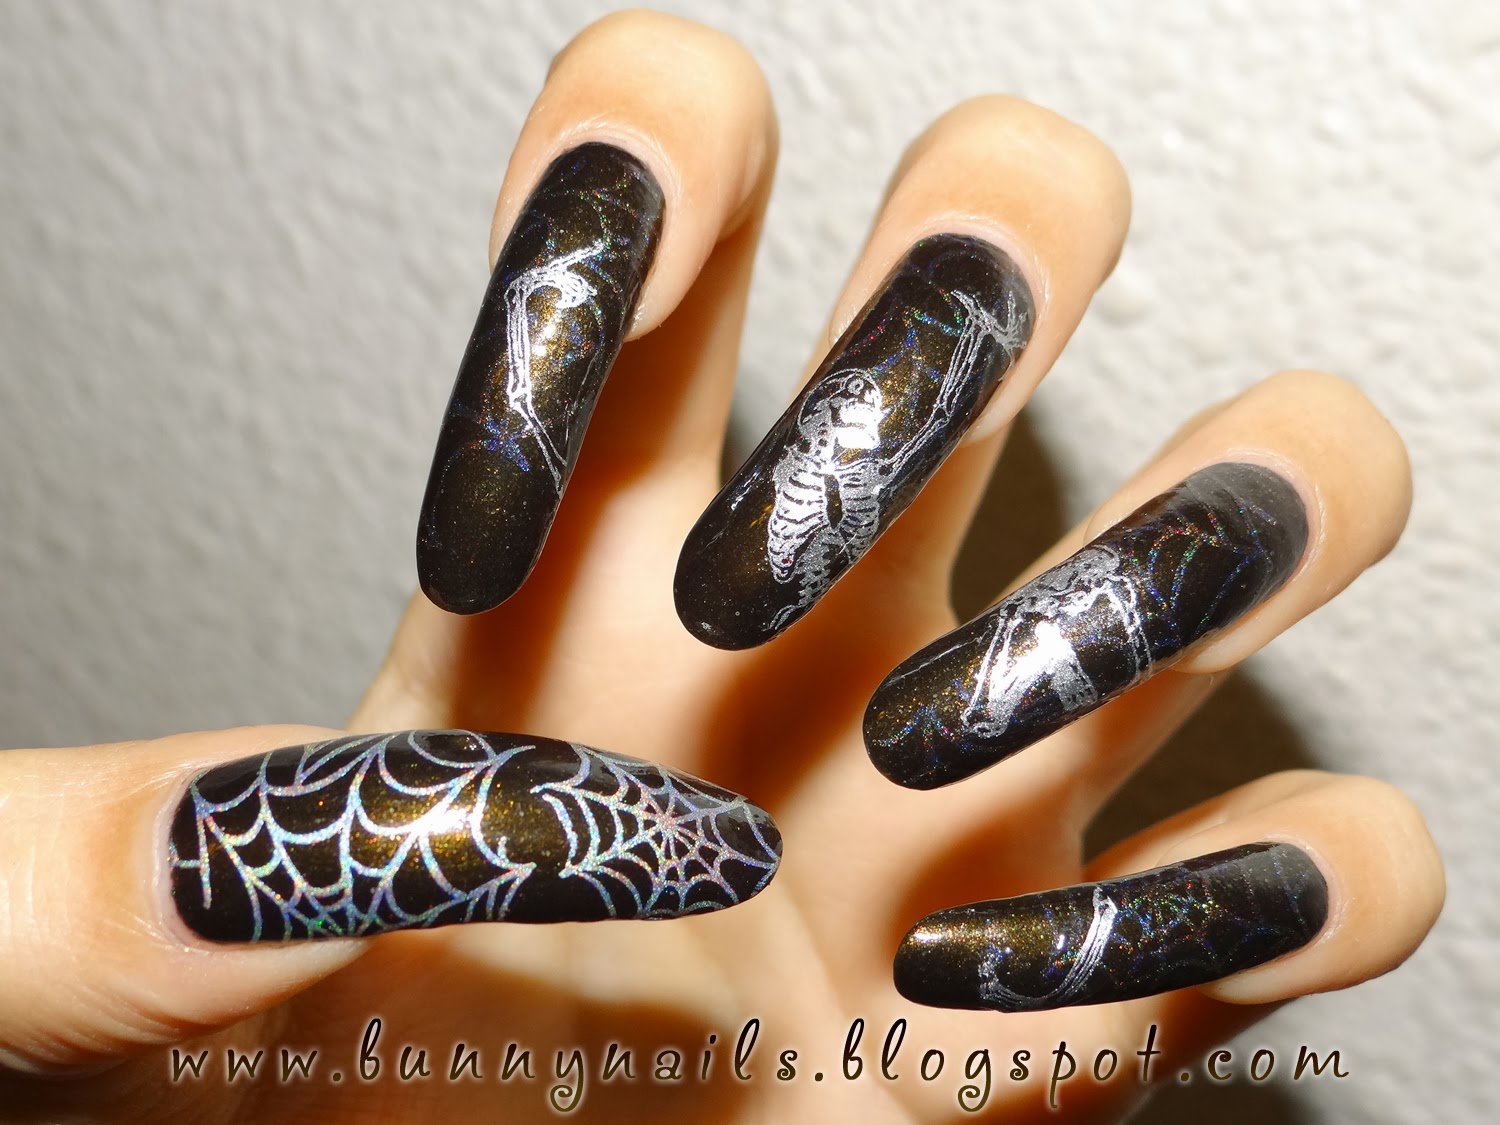
As you may have read on my previous post. I released new HD stamping plates with Halloween and Día de muertos designs. Now that they are on my hands, I put HD-C plate to the test and did a manicure with it.


(All pictures can be enlarged)

I started out by using Revlon - Enthrall as the base for this manicure.

I stamped the spiderweb pattern on the thumb using a holographic stamping nail polish that I made myself with Spectraflair pigment. On the other nails, the spiderwebs look more subtle because I used a holographic topcoat instead to give a hint of shimmery spiderwebs. I stamped the dancing skeleton image with Sally Hansen - Silver Sweep. I used the stamping decal technique to have more control of the placement of the design across my 4 nails. I just transferred the design onto the stamper, added clear topcoat, let dry and cut/applied the skeleton in parts.

A close-up pic on the spiderweb design on my thumb nail.
(Can you see the holographic effect?)

What do you think of this manicure?
(You can purchase HD C and D plates here)

♥♥Thank you so much for reading♥♥

New HD Nail Stamping Plates: Halloween and Día de Muertos

Hello dear readers!

For nail stamp fanatics out there, here are my new HD plates.
Plates HD-C & HD-D are the continuation of my holiday series, this time, featuring designs for Halloween and Día de muertos.
(Image can be enlarged)
Plates are available and ready to ship now!
You can purchase through my online store: www.bunnynails.ecrater.com or directly through this link: http://bunnynails.ecrater.com/c/1638963/hd-holiday-series-nail-art
The price for each plate is 16.99 USD and free worldwide shipping on these plates.
The size of the plates is 14.5cmx9.5cm and the full nail patterns measure 2.5cmx2cm. All patterns and designs are sized to fit on both, short or long nails. 

***You can also watch this awesome video review of the plates by Lacquer or Leave Her!


 ♥♥Thank you so much for reading♥♥

Forever 21 - Black Glam Sand Lacquer Textured Nail Polish

Hello dear readers!

As I promised on my last post, here are the swatches for Black Glam, one of the textured nail polishes by Forever 21. (Click here to see their entire line of textured nail polishes)

As you can see, Black Glam is not black, but a dark purple with  multi-color microglitter (I can see some copper, yellow, pink,purple and a bit of green) It's a bit hard to distinguish due to the dark base.

(All pictures can be enlarged)

The opacity of this nail polish is good. I only needed 2 coats to get this result.

I really like sandy texture. I own some sand finish nail polish from other brands, but this is the 1st time that I actually try it on my nails. I couldn't stop touching them. :)

Also, the formula was easy to work with. No bald spots or dragging at all.
*I received a question on my previous post about how easy was to remove this type of nail polish.
I think it's just the same as any other glitter nail polish. If you use the cotton and aluminum foil method, it makes this process so much easier ;)
 
What do you think of this nail color?
How about the textured nail polish trend?

♥♥Thank you for reading♥♥

Forever 21 - Sand Textured Finish Nail Polish Collection Swatches

Hello dear readers!

Today, I want to show you swatches of Sand Lacquer nail polishes by Forever 21 which have textured finish. I bought this collection a few weeks ago online. When I saw these nail polishes, I knew I had to have them. I love the color variety and the sparkly finish.

Now, lets see some close up pics and swatches...

 (All pictures can be enlarged)
 
From left to right: Purple Jazz, Metallic Love, Mesmerizing Magenta, Fire & Ice, Caramel Crush, Blue Jewel and Black Glam.

From left to right: Purple Jazz, Metallic Love, Mesmerizing Magenta and Fire & Ice.

From left to right: Caramel Crush, Blue Jewel and Black Glam.
 
From left to right: Purple Jazz, Metallic Love, Mesmerizing Magenta, Fire & Ice, Caramel Crush, Blue Jewel and Black Glam.

From left to right: Purple Jazz, Metallic Love, Mesmerizing Magenta, and Fire & Ice

From left to right: Fire & Ice, Caramel Crush, Blue Jewel and Black Glam.

The price per bottle is $2.80 which is a very affordable price as compared to other textured nail polishes brands out there and quality-wise, they are similar. I found them easy to apply and fairly opaque.
As far as I know, they are available for purchase online, through Forever 21 website and in-store.
One thing to note is that the names on the polishes are different listed online as compared to the actual bottle.
Online name - Bottle label
Purple Jazz - Purple/silver
Metallic Love - Champagne
Mesmerizing Magenta - Magenta Multi
Fire & Ice - Red/gold
Caramel Crush - Burnished Gold
Blue Jewel (same name)
Black Glam - Purple Gold

*On my next post, I will show you swatches on my actual nails wearing Black Glam from this collection ;)

Have you seen or tried a nail polish from this collection? 
If not, Which one was your favorite color form these swatches?

♥♥Thank you for reading♥♥


Wantable Makeup Box Review - September 2013

Hello dear readers!

Today I have something different for you, unboxing and review of the Wantable beauty box.

This month, I was contacted by Wantable to see if I wanted to try one of their boxes. Usually, I'm not a fan of beauty sampling boxes. I used to think that I would receive products that I wont really use... that was until I checked Wantable's website to see how it worked.

What made me decide to try this box was the variety of boxes to choose from: makeup box, accessories box, intimates box and the new Halloween box.
I opted for the makeup box because I love trying new makeup items and who knows? they might include a nail polish to add to my collection :)
One thing I really liked about this makeup box is that you receive 4-5 full size products.
Also, once you sign up on their page, you have fill out a survey about the makeup products that you love, like and dislike. You will never receive the products that you don't like. Pretty cool, right?

Without further ado, here's the September box I got:

*At the end of this post,  I will also include a picture of me with a makeup look using items from this box ;)


Now to the close ups of the makeup items:


Japonesque angled foundation brush (Retail $25)

29 Cosmetics - Reserve moisturizing lipstick in Expressive Rose (Retail $25)


LAQA & CO. nail polish in Burple (Retail $11)

Michael Marcus brow pencil in Brunette (Retail $24)

And that's me with a makeup look using the the angled foundation brush (to apply my BB cream), brow pencil and the lipstick... coincidentally, the nail polish I was wearing matches with my lipcolor :)

Overall, I'm very pleased with this box. I liked all the products from this box and I will continue using them. I think this is thanks to the survey I took on Wantable about my makeup preferences.
The makeup box is $36 for a monthly subscription and $40 for one-time purchase. If you consider the retail price of all the items ($85), it's a very good deal and I got to try makeup brands that I might have not tried otherwise.You can purchase this box here. They ship to the US, Canada and Australia.

*This box was sent to me for review purposes.

I hope you liked this review which is actually first time for me to feature makeup items.

What are your thoughts about this box?
♥♥Thank you so much for reading♥♥

Challenge: Tone-on-Tone Stamping

Hello dear readers!

I did another manicure for FB group AiS. For Sunday September 1st, the theme of the challenge was tone-on tone which was pretty easy. I chose gray tones for this manicure because it's one of my favorite colors that I rarely get to wear.


I started with China Glaze - Pelican Grey as the base...

Then, I applied a layer of Spectraflair topcoat.
After that, I stamped a full nail design from plate XL M using Kleancolor - Charcoal for stamping.
(Kleancolor Charcoal doesn't work as a nail polish at all, takes ages to dry or slides off your nail...other than that... for stamping, it works flawlessly) ;)
Extra pic :)


 What do you think of this nail art?
As always...
♥♥Thank you so much for reading♥♥

How to do Nail Stamp Decals

Hello dear readers!

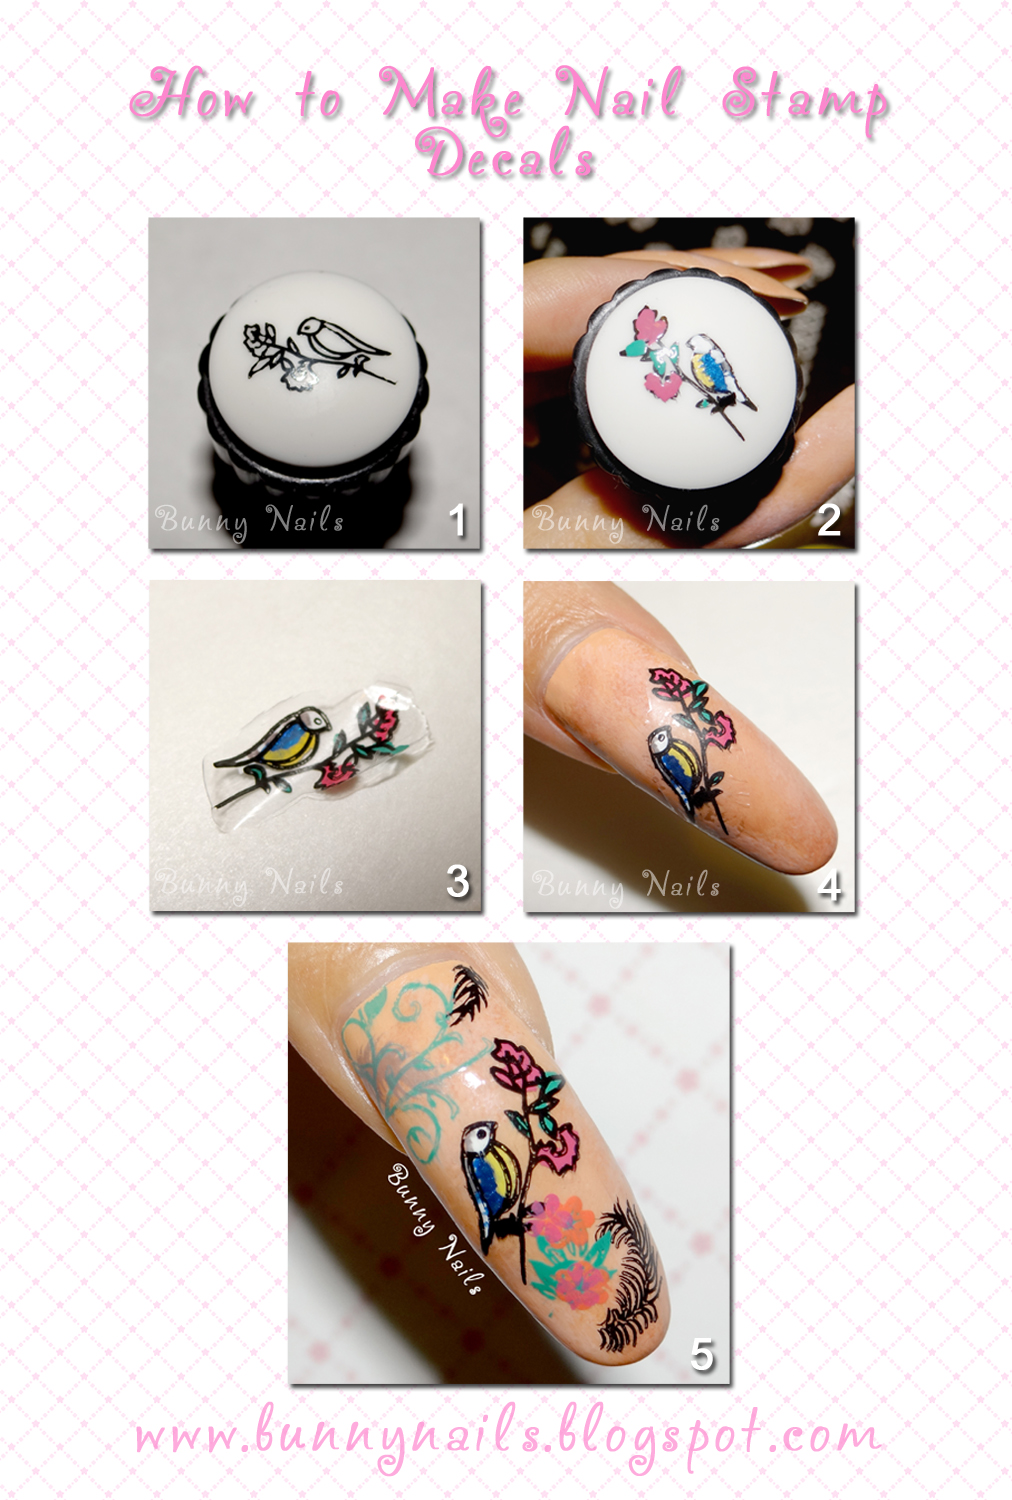
As I promised, here is the tutorial on how to make nail decals by using designs from nail art plates.
 
I will describe all the steps below the image.
Step1: Transfer your favorite image onto a nail stamper of your choice. I used a small soft stamper and  a bird design from Stamping plate XL M using Nabi black as my stamping nail polish.

Step2: With the design still on the stamper, paint inside the image using a small brush or with your nail polish brush. Nail polish or acrylic colors can be used. Let dry. *Cover the design using a clear topcoat and let dry. I used Out the Door fast dry top coat. it makes this process much faster ;)

Step3: Once the design is dry, peel off using tweezers (or in this case, my own nails).

Step4: Apply clear topcoat on your nail color base. This step is important so that the surface is sticky enough for the decal to stick on your nail. *Make sure to let dry the topcoat a little bit before applying the decal, it should be dry to the touch but a little bit sticky. Place the decal on your nail and smooth it out carefully to get rid of creases or air bubbles.

Step5: Apply clear topcoat to protect and give shine to your decal. You can add other details before applying topcoat.

I hope this tutorial will be useful to you and that you now will be able to try this nail art ;) 
If you have any questions, let me know by leaving a comment :)

♥♥Thank you so much for reading♥♥