Showing posts with label sally hansen. Show all posts

Halloween Night

Hello dear readers!

This is my last Halloween nail art of the year. I did 4 different manicures in total which is an improvement because I usually only did 1 manicure on previous years. This manicure is originally my bf's idea. He wanted to do all the nail polishing and stamping himself but then got frustrated by my huge nail polish stash. From what he told me about his idea, this is what I came up with:

I started with LVX nail polish in Legendaire as the base. I stamped a grunge splatter pattern from HD-C plate using Sally Hansen Insta-dri in Lively Lilac. I stamped all the small designs using HD C and D plates including a tree design from last year's collection.

I used Nabi in black for stamping. on some designs I used the decal technique to do a reverse stamping. 

Here's the stamping on my thumb.

I hope you liked this nail art ;)
♥♥Thank you for reading♥♥

Happy Halloween!


Cute Ghosts and Pumpkins Halloween Nail Stamping

Hello dear readers!

I'm trying to make Halloween manicures as much as I can to give you some nail art ideas. I usually keep my nail art for 2 weeks, which is a long time. This is the reason I decided to do a different nail art for my left and right hand. On my left hand, I did the skeleton mani I showed you last post. Now, on my right hand, I wanted something more cute.

I think this is the1st time I ever show my right hand since I always use it for taking pictures :D
(All pictures can be enlarged)

For this manicure, I started with Revlon Enthrall as the base. and I stamped holographic nail polish on my nails to give a touch of shimmer and dimension to the nail art. I used my HD-C plate for the cute ghosts, candies and "Trick or Treat" lettering. For the spiky vines and pumpkins, I used the HD-D plate. 
I used Sally Hansen Insta-Dri nail polishes: Brisk Blue, Lickety-split Lime, Lightening, Lively Lilac, Mint Sprint, Presto Pink and Snappy Sorbet for stamping as well as Konad White for the ghosts.

Here are my hands with both Halloween manicures

And here is my right thumb with the stamped holographic spiderwebs

What do you think of this Halloween manicure? 
Is it a good idea to wear 2 different manicures at the same time? :D

♥♥Thank you for reading♥♥

Halloween Skeleton Nail Stamping

Hello, dear readers!

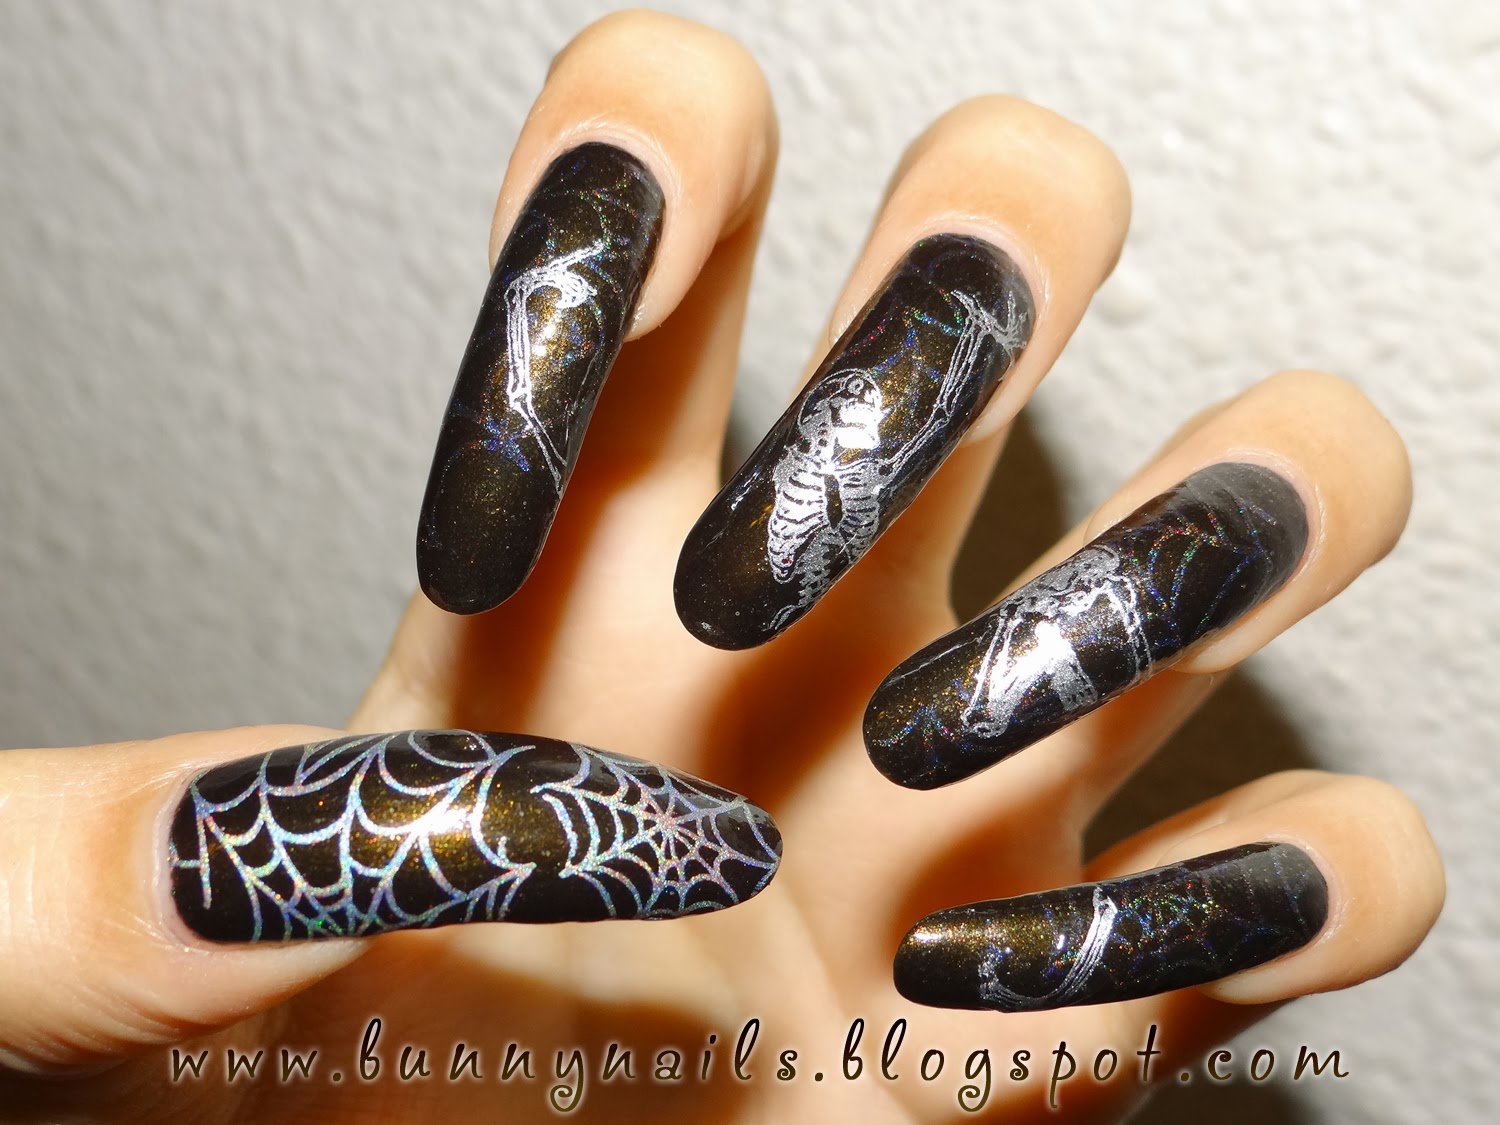
As you may have read on my previous post. I released new HD stamping plates with Halloween and Día de muertos designs. Now that they are on my hands, I put HD-C plate to the test and did a manicure with it.


(All pictures can be enlarged)

I started out by using Revlon - Enthrall as the base for this manicure.

I stamped the spiderweb pattern on the thumb using a holographic stamping nail polish that I made myself with Spectraflair pigment. On the other nails, the spiderwebs look more subtle because I used a holographic topcoat instead to give a hint of shimmery spiderwebs. I stamped the dancing skeleton image with Sally Hansen - Silver Sweep. I used the stamping decal technique to have more control of the placement of the design across my 4 nails. I just transferred the design onto the stamper, added clear topcoat, let dry and cut/applied the skeleton in parts.

A close-up pic on the spiderweb design on my thumb nail.
(Can you see the holographic effect?)

What do you think of this manicure?
(You can purchase HD C and D plates here)

♥♥Thank you so much for reading♥♥

Challenge: Stamping Over a Nude Base

Hello dear readers!

Last Sunday's challenge on FB group Adventures in Stamping was to do some stamping nail art on a nude base. I find this group very fun because it stimulates my creativity when I have no inspiration.

Well, here's what I came up with:
More details below....

The base color for this nail art was Palm Springs by American Apparel. Then I did some sponging using other lighter and darker nude tones to give more dimension to the background of my design.

For stamping polishes, I used:
-Sally Hansen Insta-Dri - Mint Sprint (leaves and foliage)
-Sally Hansen Insta-Dri - Presto Pink (Flowers)
-Sally Hansen Insta-Dri - Snappy Sorbet (Flowers on thumb)
-Pop Beauty - Thirty Seven Foggy (Light grey foliage)
-Nabi - Black (Feathers)
For designs, I used:
-XL R plate (Bird on thumb, flowers, big feathers)
-XL F plate (Small flowers, leaves on thumb)
-XL M plate (Big flowers and foliage on ring finger)
-QA23 (Vines on thumb and pinkie)
-A49 (Flowers and leaves on  index)
-m77 (Small feathers and flowers on pinkie)


Here's a detailed picture of what I did on my thumbnail using the stamping decal technique
*I will do a tutorial on this next week

 What do you think of this nail art?
Stay tuned for my tutorial on how to do a nail decal using a stamping design next Monday ;)

♥♥Thank you so much for reading♥♥

Valentines Day: Leopard Heart Print

Hello dear readers and nail friends!

Today I want to show you a simple nail art using a  nail stamp pattern from my HD - B plate.
I always saw  leopard heart print manicures on my favorite Japanese nail art magazines and thought how cute it looked but I have zero patience for drawing every single shape on my long nails :( this was my inspiration for this design.

(All pictures can be enlarged)
For this manicure, I started with two coats of Orly Prelude to a Kiss (such a lovely name). 
I stamped the leopard heart print using Sally Hansen Insta-Dri Cinna- snap 


I hope you like this manicure :)

 ♥Thank you so much for reading and leaving nice comments♥

Happy Valentines Day!

           @@@   @@@       @@@   @@@       @@@   @@@       @@@   @@@
@ @ @ @ @ @ @ @ @ @ @ @ @ @ @ @
\\\\ @ @ @ @ @ @ @ @ @ @ @ @
------@ )---( @-----@ )---( @-----@ )---( @-----@ )---(
@-------->
//// @ @ @ @ @ @ @ @
@ @ @ @ @ @ @ @
@ @ @ @ @ @ @ @
@ @ @ @ @ @ @ @
@ @ @ @


Challenge: Valentine's Day

Hello dear readers and nail friends ;)

Here is my first manicure of  2013, this Sunday FB group AIS challenge was a Valentine's day themed manicure. This was definitely a chance to try out and show you what you can do with my new HD-A & HD-B Stamping plates.
(All pictures can be enlarged)
For this manicure, I used Sally Hansen White On as the base.
I stamped the heart pattern, cherub and love word using Sally Hansen Insta-Dri Rapid Red.
For the accent nail, I applied clear nail polish and put heart shaped glitters to frame my nail.

Here's my right hand that you rarely see on my posts :-p
oops, a glitter heart fell off...

♥Thank you for reading my blog and leaving nice comments ♥ 
If you have a request for a nail art idea you would like me to do, let me know by leaving a comment below.

Haters: If you don't like my nails and want to tell me they are ugly and they look like those of a witch, don't waste your time... I will always take that as a compliment... Ha ha ha ;-p

My Nails for Día de Muertos (Day of the dead)

Hi dear readers!

I want to show you my manicure for Day of the Dead.

To those who are not familiarized with this festivity. It is a Mexican festivity that takes place in Nov. 1st (for children) and Nov 2nd (for adults). It is a day to remember your loved ones who have passed away. It is believed that on this day, the spirits of loved ones come back to their families. That is the reason many people visit the cemetery and make offerings with flowers, food and other things that the deceased liked when they lived.

To guide the spirit of a loved one to ones home, people arrange altars and adorn it with cut out paper and make offerings of fruits, food, flowers and skulls made of sugar. Candles are lit because the light will guide the spirits to their homes.

As you can see, I tried to add many elements this tradition into this manicure. Everything you see (except the little dots around the skull eye socket ) was made using nail stamping plates.
The stamp plates I used:
A03, A30, A44, A57, AT03, BuNa01, GCOCL C02, HD03, HD04, m55, QA6, XL F and XL K (holiday).

Nail polishes I used:
Base - OPI Who are You Wearing?
Stamping polishes - Sally Hansen Insta-dri in Silver Sweep, Brisk Blue, Snappy Sorbet, Mint Sprint, Lickety Split Lime, Lively Lilac, Presto Pink, Speedy Sunburst, Lightening and Konad White.

I really wanted to share this manicure with you because this celebration has a special meaning to me and I feel very close to this tradition.

I hope you like this manicure and if you didn't know about this day, I hope you learned something new with this post.

♥ ♥Thank you so much for reading♥ ♥

An affordable flakie! Elf Fairy Dust

Hello dear readers!
If you missed on Sally Hansen Hidden Treasure, this is a perfect dupe for it!
It is a true flakie and you can't beat the $2 price tag!!
Hope Elf makes flakies in more colors *fingers crossed*
Link to this nail polish here.


♥Thank you for reading♥

Pearl White French Manicure

Hello again dear readers!

Sorry for not posting as often as I would like to, blame my camera for that. I really take pride in taking good care of all my stuff. My Sony camera has lasted for 8 years now, and is still as good as new...but the pictures always come kind of dark and every time I take picture of my nail art, I have to edit the lighting. Sometimes I'm too lazy to do that every time I want to do a post.

Well, I want to show you my french manicure which has lasted me for more than 10 days and I'm still wearing it. I wash the dishes and do chores around the house, I'm not a princess... I'm always impressed that most of my manicures last  2 weeks or more.


I started with a basecoat, and for this French manicure, I used French tip guides. I painted the base of the tip with White On by Sally Hansen. My manicure was clean looking but I wanted something else, so I used Mia Secret French Manicure nail polish in White Pearl. Pearl finish nail polishes can be a little bit streaky, so I used the sponge to apply the nail polish.


I really liked my French mani with a pearl finish. I think it looked bridal-like and I loved it.


Did you like the pearl white French manicure?

♥Thank you for reading♥

Awesome K-Mart Clearance


If you like Sally Hansen nail products, run to your K-Mart right now and check for clearance!  I passed by the beauty department on my way to the register and noticed some clear tote like bins sitting on a shelf and there were nail polishes in them with clearance stickers, so of course I stopped to look.  They were all Sally Hansen products for super cheap!  I got the following items for a great deal:

Insta-Dry in Teal-y Fast: Originally $4.99 on clearance $1.23
Diamond Strength Nail Color in Pink Proposal and Rose Amore: Originally $4.69 on clearance $1.17
Salon Effects Nail Strips in Squeezed, Groove, Violet Night, and Red-y for Trouble: Originally $9.49 and on clearance (WAIT FOR IT)  for .80, that's right, just eighty cents!
Broadway Nail Dress Stickers: Originally $5.49 on clearance $1.37

I was most excited about the nail strips because I've heard people rave about them, but come on, $9 to get one manicure out of them?  I would rather put that toward a regular manicure at the salon.  I will gladly try them out for eighty cents though :-) I am super happy about my find and hope you can find some great deals at your local store!

Sally Hansen - Blush Diamond Holographic

Hello!

I want to show you swatches of one of the nail polishes I bought in a blog sale I posted earlier.
I was able to get two bottles of Sally Hansen Nail Prisms in Blush Diamond. The bottles are slightly used but I don't mind because it is such a gorgeous dusty pink holo.

 Pictures can be enlarged.

It took two coats to achieve this opacity.

Look the holographic shine in the bottle:

An extra pic.

Do you own any of the holos from Sally Hansen Nail Prisms?

♥Thank you for reading♥

Blog Sale Nail Polish Haul

Hello dears!

I have been into shopping for nail polish from blog sales recently because I have not had time to go out shopping.

What I like about blog sales is that I can find brand name nail polishes at very affordable prices. Some nail polishes are brand new, swatches or used for a manicure or two but I don't really care as long as the condition is described accordingly. I'm very happy with these purchases, the blogger I bought from were very nice and some including extra gifts.

Here is what I have bought from different sellers during these past weeks:

From left to right: Color Club- Tru Passion, Untamed Luxury and Worth the Risque. China Glaze - Custom Kicks, It's Poppin', Tinsel and Zombie Zest.

Zoya - Astra, Kristen, Gigi and Luna. Orly - Pixie Dust, Prince Charming, Mirror Mirror and Rage.

Icing - Golden Rule, Cosmetic Arts - unnamed bottle, Funky Fingers - unnamed bottle, SH Nail Prisms - Blush Diamond (x2), Ruby Diamond. OPI Nic's Sticks - Silverella (x2)

Milani - Enchantment, Garnet Gems, Fairy tale, OPI - You Don't Know Jacques, Wet n' Wild - Gray's Anatomy, Sally Hansen - Rockstar Pink, Maybelline - Pie in the Sky, Savvy - Prince Ala Charm.

I also bought a big bottle of Solar Oil to pamper my nails.

I hope you had a nice weekend!

My First Franken - picture heavy ; )

Hello dear readers!
It is been a couple of weeks since the last time I posted. I was busy with school (final exams, assignments...). Now I'm officially on vacation  since last Friday. I haven't done anything on my nails because I don't feel like it... I've been feeling a bit down since I finish my semester. It is weird, when I'm in school, I want to take some time off and now that I'm on vacation, I miss school : (  I guess I've been studying nonstop so much that I got used to it, hahaha

Today, I want to show you my first franken polish, it is not like the Spectraflair top coat that I just added the pigment to clear polish...This time I mixed a bunch of nail polishes and glitters.
More pictures below:

It all started as an accident, I wanted to add some holographic shine to a Japanese nail polish that I never got to use (my mom did ^_^), but I guess the color was too sheer because it turned out grey in color... I thought I had ruined my precious Japanese nail polish, and the only way to fix it was to add some color to it.

*For this franken polish I used some drops of:
Borghese - Clear
China Glaze - Millennium
Kleancolor - Neon Pink
Kleancolor - Pearl Fuchsia
Kleancolor - Metallic Pink
Sally Hansen - Sweetheart
*Then, I added A few tiny scoops of :
Spectraflair --of course ;)
Fantasy Makers glitter - Glitz (silver holographic)
Squared translucent glitter

I mixed and swatched until I was happy with the opacity and color and here is the result:
This is the bottle, isn't it pretty?

Here you can see the color and glitter in more detail:
 

Here is the nail polish on my nails:
 

This is the nail polish that I'm currently wearing... since almost 3 weeks! I'm surprised that it has not chipped yet, I love it ;)

What do you think of my first real franken? Your comments are always welcome :)