Showing posts with label revlon. Show all posts

Cute Ghosts and Pumpkins Halloween Nail Stamping

Hello dear readers!

I'm trying to make Halloween manicures as much as I can to give you some nail art ideas. I usually keep my nail art for 2 weeks, which is a long time. This is the reason I decided to do a different nail art for my left and right hand. On my left hand, I did the skeleton mani I showed you last post. Now, on my right hand, I wanted something more cute.

I think this is the1st time I ever show my right hand since I always use it for taking pictures :D
(All pictures can be enlarged)

For this manicure, I started with Revlon Enthrall as the base. and I stamped holographic nail polish on my nails to give a touch of shimmer and dimension to the nail art. I used my HD-C plate for the cute ghosts, candies and "Trick or Treat" lettering. For the spiky vines and pumpkins, I used the HD-D plate
I used Sally Hansen Insta-Dri nail polishes: Brisk Blue, Lickety-split Lime, Lightening, Lively Lilac, Mint Sprint, Presto Pink and Snappy Sorbet for stamping as well as Konad White for the ghosts.

Here are my hands with both Halloween manicures

And here is my right thumb with the stamped holographic spiderwebs

What do you think of this Halloween manicure? 
Is it a good idea to wear 2 different manicures at the same time? :D

♥♥Thank you for reading♥♥

Halloween Skeleton Nail Stamping

Hello, dear readers!

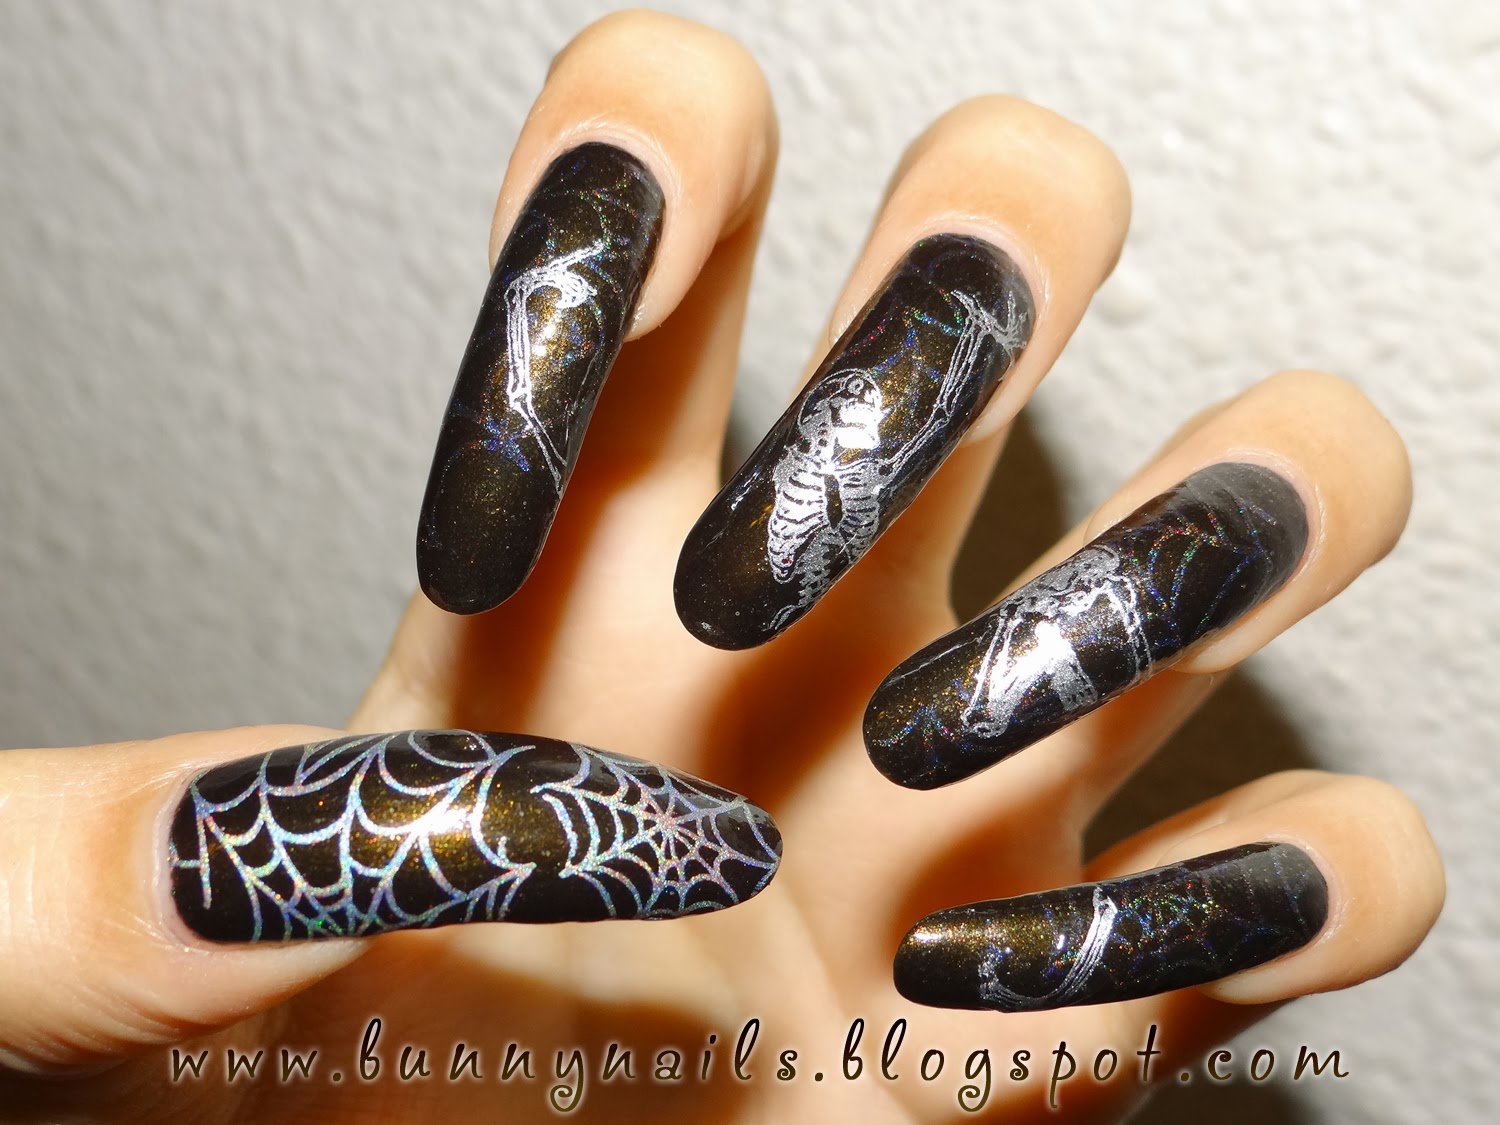
As you may have read on my previous post. I released new HD stamping plates with Halloween and Día de muertos designs. Now that they are on my hands, I put HD-C plate to the test and did a manicure with it.


(All pictures can be enlarged)

I started out by using Revlon - Enthrall as the base for this manicure.

I stamped the spiderweb pattern on the thumb using a holographic stamping nail polish that I made myself with Spectraflair pigment. On the other nails, the spiderwebs look more subtle because I used a holographic topcoat instead to give a hint of shimmery spiderwebs. I stamped the dancing skeleton image with Sally Hansen - Silver Sweep. I used the stamping decal technique to have more control of the placement of the design across my 4 nails. I just transferred the design onto the stamper, added clear topcoat, let dry and cut/applied the skeleton in parts.

A close-up pic on the spiderweb design on my thumb nail.
(Can you see the holographic effect?)

What do you think of this manicure?
(You can purchase HD C and D plates here)

♥♥Thank you so much for reading♥♥

Comparison: Revlon Royal & OPI Eurso Euro

Here's a quickie comparison between Revlon Royal and OPI OPI... Eurso Euro:


Sorry for the slightly dark lighting. This is the only way that I can photograph these accurately.

As you can see, the colors are really close but not identical. OPI... Eurso Euro is a tad more red-toned as compared to Revlon Royal. Royal is also slightly brighter and more vibrant.

If I really have to choose between one of them (heaven forbid), I will go for Revlon Royal. It is more versatile - think jelly sandwich, etc! <3

Which do you prefer?

xoxo,
mich

HARE polish: Part II

As promised, here's part 2 of my mini HARE haul!


Midsummer's Midnight. 1 coat over black.
Black jelly with a mix of purple, fuchsia, green and the occasional blue glitters in various shapes and sizes. I can't even find words to describe how freaking beautiful this is - words are probably redundant anyway. The polish builds up nicely by itself in 2 to 3 coats (I know because I've worn this twice already) but the swatch above shows one coat over black. I can't decide which way I like it more. They are both stunning and eye-catching. <3 My friends love it and even my friend's boyfriend noticed it - just in case you are wondering, I think he gave a stamp of approval. :tup


Twilight Savings. 3 thick coats / 6 thin coats.
A beautiful blue/purple polish (somewhere between a periwinkle and majorelle blue) with silver squares and small purple hexes.

This is the only one that gave me some problems. Don't get me wrong! I love it a lot but it was not easy to work with. It was really sheer when I first painted it on my pinky and I found that I needed at least 6 thin coats to get the opacity that I liked. It looked pretty (there was a lot of depth to the look) but it was very tedious and a little thick on the nail. Because I couldn't find the right undies for it, I slapped on three thick coats for the rest of the nails instead. I ended up with lots of square glitters on my nails. :et
I've googled around a bit and I think not everyone had the same issue as I did. It looked beautiful on Sarah at just three coats and on Nikole at just two coats.


Revlon Royal-Twilight Savings-Royal-Twilight Savings.
A jelly sandwich with Revlon Royal! I just couldn't resist - the silver glitters were simply calling to be sandwiched! :L
On a side note, Royal is really gorgeous - a vibrant royal blue jelly with so much depth. If you don't have it, you should hunt it down.

So that's all the HARE polishes I have for now.
And if you know me, they will definitely not be my last. ;)

Just in case you are itching to get some HARE polishes too, the next restock at Llarowe will be this coming Wednesday and it will include Bisbee, A Positive, Pegasus, Monster and the Fall collection. I am not too sure if Nikole will restock her Etsy shop too.
Word has it that Nikole is going to be putting up swatches of her new Fall collection soon so do keep an eye out on her Facebook page or her blog. I simply can't wait!!!

xoxo,
mich

p.s. Do check out Part I of my HARE haul here if you have missed it!

Metallic Pink Zebra

Hello dear readers :)

Here my manicure for last week.
I started with 2 coats of Revlon Innocent from the Edgy Elegance collection which is a pink color with a pastel foil finish. I used stamp plate A22 for the zebra print.

With my nail length it is getting more and more difficult to find a full nail design that covers my entire nail. This is the reason I chose this design, as it is simple and I can do almost seamless double stamping ;)


Extra pic ;)

Thank you for reading♥♥♥

Do you have any suggestion or idea for a nail art you would like me to do?
Let me know in the comment section ;)

Spring/Summer Manicure


So since the weather has been decent for a few days, I was starting to get into that spring/summer mood.  I decided I needed a brighter manicure.  I went searching through my stash to find a good pink since hot pink is always a good go to color.  I decided on Revlon's Pink Freeze.  It is a hot pink frost, which I typically stay away from, but this particular one is a good formula.  I then decided to throw on some Claire's nail polish in Candy Shop on top of Pink Freeze for the ring finger and thumb.  This polish is an exact dupe for the heavily sought after (and expensive) Deborah Lippman Candy Shop nail polish.  I was gonna leave it at that, but decided to play around with my nail stamping kit.  I used Pure Ice polish in Silver Mercedes to stamp with, and threw some little white dots onto the middle of the flowers.  I think the silver on top of a metallic pink was a little hard to see, so I'm gonna try the silver over a darker color next.  But the manicure is definitely bright and happy like I wanted!

Also on a side note, my cuticles are a hot mess, since I have insanely dry skin always....and if anyone has a recommendation for a great cuticle cream or oil I'd love to know.  I'd like to find one that really works and could use some ideas!

Enjoy and have a bright happy day :-)

Lacy Nails + Nail Stamp Trick

Hello girls! Thank you so much for reading my posts, commenting and following. I have 500+ followers! I know most of you have come to know this blog because of my giveaway and that is ok because that's the way I got to know many of my favorite bloggers. I hope that you can get to like my posts :)

Today, I will show you the nail stamping design I did using lace stamps from the QA plate series (QA 13, QA6 and QA 8). My favorite nail art design is lace and that's why I chose to do this mani.... There is some smudging because I brushed on the topcoat a little too much...

A nail stamp trick to avoid cleaning your stamper with acetone after each stamp:
Use a strip of clear packing tape and place the stamper over the sticky side so that the remaining nail polish sticks to the tape. In this case I pull the tape and stick it backwards on the same roll.

Can you see how long my nails have gotten?
By the way, I used Revlon "Gray suede" nail polish for the base and Kleancolor "Black" for the stamp.

Did you already use tape to clean your stamper? What other tricks do you recommend?

I always read your comments and answer questions. Don't be shy and feel free to comment ;)