Showing posts with label nail art. Show all posts

2x1 Día de Muertos Nail Art

Hello dear readers!

Today I will be showing you two different Día de muertos (Day of the dead) nail art in the same post ;)
I wanted to try a more traditional one and a simpler one, but with a similar theme.

More detailed pictures and details below....

As I wrote on my día de muertos post from last year, Nov. 1st (children) and Nov. 2nd (adults) are days for Mexicans to remember our loved ones who are no longer with us. We prepare an altar with elements such as fruits, food, and other elements that are supposed to guide the spirit of our loved one to us and then back to the afterlife.
(A  traditional día de muertos altar)

Now, this theme translated to nail art...

*I added the dead lovers as the center of this nail art as a symbol of love after death. 
Absence does not mean forgetting.
There will always be a very special place in our hearts for those who have gone before us.

For this manicure, I started with China Glaze - Howl you Doin' as the base. Then, I stamped the lover's skeletons, papel picado (cut paper) pattern, crosses and candles from HD C and HD D plates.
I painted the skeletons using the stamping decal technique.
On my thumb, I applied a combination of stamping sugar skulls and added flower stickers for extra decoration.
*In Mexico, calaveras de azúcar (sugar skulls) are given as a treat for this celebration or as part of the altar. When given to a friend or relative, the name of the receiver is usually written on the skulls forehead. 

Now, the 2nd nail art theme is death as part of life itself.
It is a fact that many people don't like to think about because it may sound gruesome or sad.
The day we are born, we have started a journey that will finish with death.

A part of a dancing skeleton stamped on my nail...
The skeleton is probably mocking us, saying "Cómo me ves, te verás"
(The way you see me now, sooner or later you will look like me).
 ----------------------------------

I hope you liked any of these two nail art that I made for this very special post.
I had to take some time to write something meaningful for this day because this festivity is very close to my heart. So, if you took your time to read through this post, I hope you've learned a little bit about día de muertos.

♥♥Thank you for reading♥♥


Halloween Night

Hello dear readers!

This is my last Halloween nail art of the year. I did 4 different manicures in total which is an improvement because I usually only did 1 manicure on previous years. This manicure is originally my bf's idea. He wanted to do all the nail polishing and stamping himself but then got frustrated by my huge nail polish stash. From what he told me about his idea, this is what I came up with:

I started with LVX nail polish in Legendaire as the base. I stamped a grunge splatter pattern from HD-C plate using Sally Hansen Insta-dri in Lively Lilac. I stamped all the small designs using HD C and D plates including a tree design from last year's collection.

I used Nabi in black for stamping. on some designs I used the decal technique to do a reverse stamping. 

Here's the stamping on my thumb.

I hope you liked this nail art ;)
♥♥Thank you for reading♥♥

Happy Halloween!


Halloween Nail Art: Zombie Mayhem

Hello dear readers!

I'm trying to come up with more Halloween nail art... I think the idea of doing one on each hand has helped me accomplish  that...

This time, I bring to you a zombie inspired manicure...

(All pictures can be enlarged)
For this nail art, I started with Sun Kissed by Cameo Colours as the base. It is a thermal nail polish which is orange-beige when cold and lime green when temperature turns warm... perfect zombie color combination.
I used  Halloween stamping plates HD C and D for the designs.
Here's what I did on the thumb, blood splatter as the background and a bunch of zombie hands.
I used Sally Hansen Insta-dri in Cinna-snap as the stamping polish for all the blood you see on this manicure.
This is how the manicure looks under cold temperature. The eyes, brains and axe were stamped using the decal technique.
Here you can see the eyes and brains in more detail.

Here are some of the stamping decals that I used on my nails.

What do you think of this manicure? 
♥♥Thank you for reading♥♥

Cute Ghosts and Pumpkins Halloween Nail Stamping

Hello dear readers!

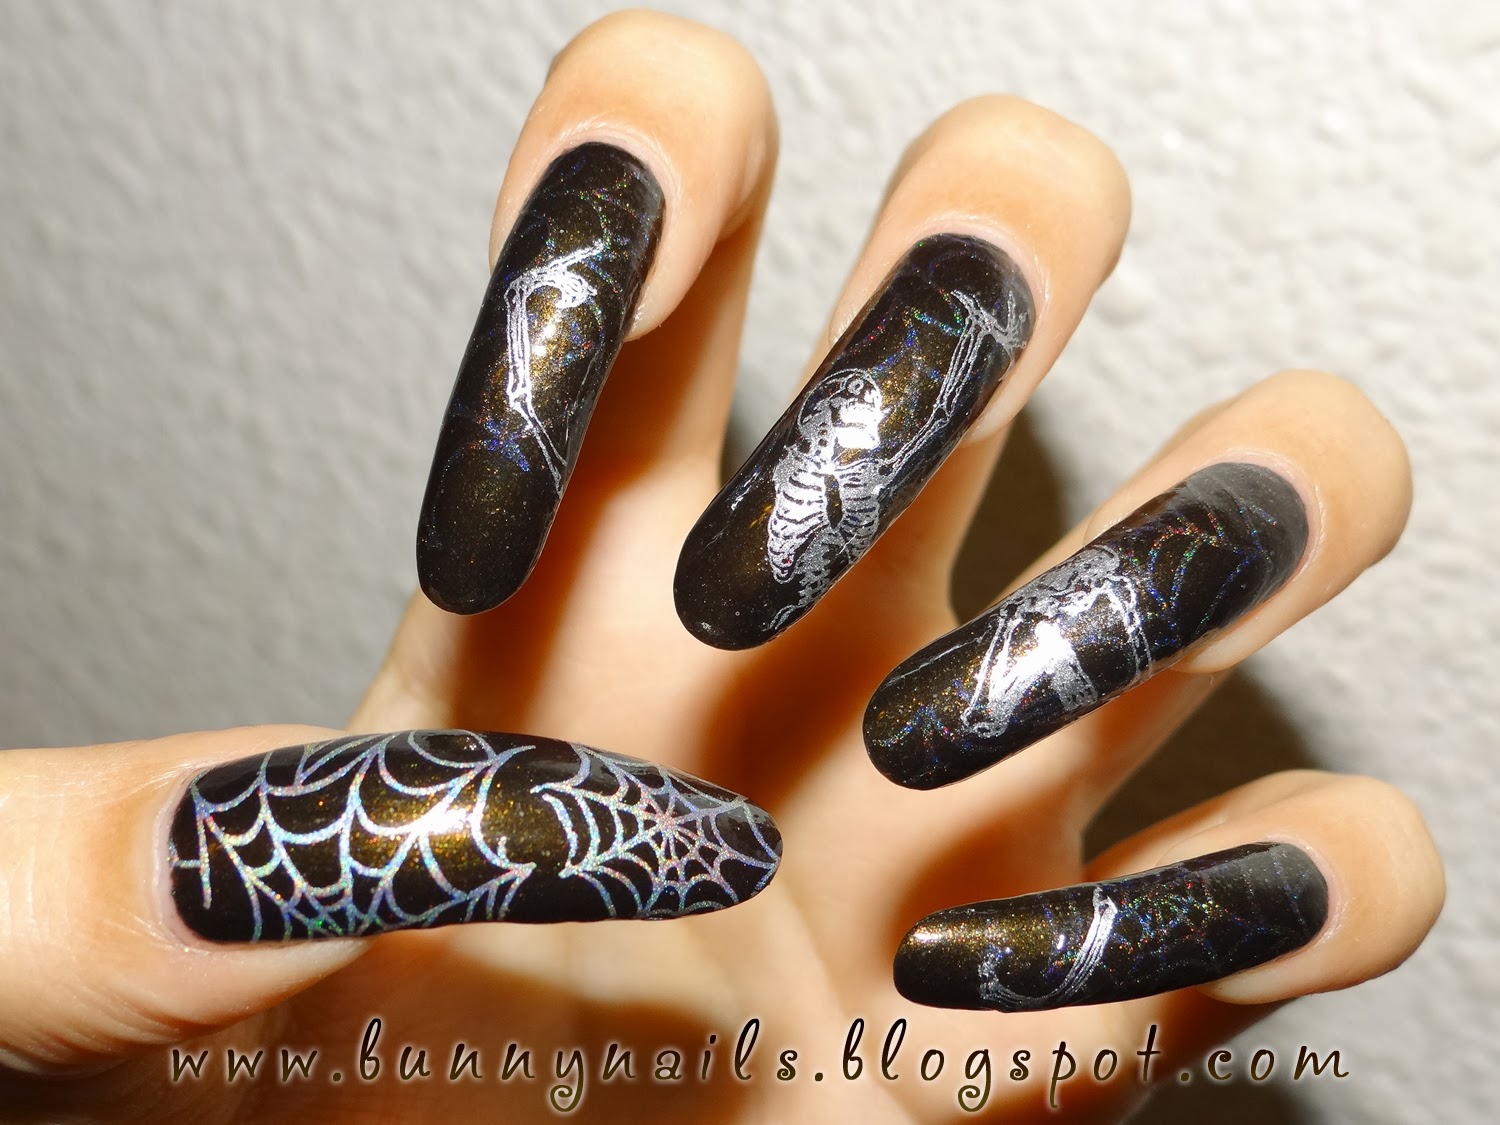
I'm trying to make Halloween manicures as much as I can to give you some nail art ideas. I usually keep my nail art for 2 weeks, which is a long time. This is the reason I decided to do a different nail art for my left and right hand. On my left hand, I did the skeleton mani I showed you last post. Now, on my right hand, I wanted something more cute.

I think this is the1st time I ever show my right hand since I always use it for taking pictures :D
(All pictures can be enlarged)

For this manicure, I started with Revlon Enthrall as the base. and I stamped holographic nail polish on my nails to give a touch of shimmer and dimension to the nail art. I used my HD-C plate for the cute ghosts, candies and "Trick or Treat" lettering. For the spiky vines and pumpkins, I used the HD-D plate. 
I used Sally Hansen Insta-Dri nail polishes: Brisk Blue, Lickety-split Lime, Lightening, Lively Lilac, Mint Sprint, Presto Pink and Snappy Sorbet for stamping as well as Konad White for the ghosts.

Here are my hands with both Halloween manicures

And here is my right thumb with the stamped holographic spiderwebs

What do you think of this Halloween manicure? 
Is it a good idea to wear 2 different manicures at the same time? :D

♥♥Thank you for reading♥♥

Halloween Skeleton Nail Stamping

Hello, dear readers!

As you may have read on my previous post. I released new HD stamping plates with Halloween and Día de muertos designs. Now that they are on my hands, I put HD-C plate to the test and did a manicure with it.


(All pictures can be enlarged)

I started out by using Revlon - Enthrall as the base for this manicure.

I stamped the spiderweb pattern on the thumb using a holographic stamping nail polish that I made myself with Spectraflair pigment. On the other nails, the spiderwebs look more subtle because I used a holographic topcoat instead to give a hint of shimmery spiderwebs. I stamped the dancing skeleton image with Sally Hansen - Silver Sweep. I used the stamping decal technique to have more control of the placement of the design across my 4 nails. I just transferred the design onto the stamper, added clear topcoat, let dry and cut/applied the skeleton in parts.

A close-up pic on the spiderweb design on my thumb nail.
(Can you see the holographic effect?)

What do you think of this manicure?
(You can purchase HD C and D plates here)

♥♥Thank you so much for reading♥♥

New HD Nail Stamping Plates: Halloween and Día de Muertos

Hello dear readers!

For nail stamp fanatics out there, here are my new HD plates.
Plates HD-C & HD-D are the continuation of my holiday series, this time, featuring designs for Halloween and Día de muertos.
(Image can be enlarged)
Plates are available and ready to ship now!
You can purchase through my online store: www.bunnynails.ecrater.com or directly through this link: http://bunnynails.ecrater.com/c/1638963/hd-holiday-series-nail-art
The price for each plate is 16.99 USD and free worldwide shipping on these plates.
The size of the plates is 14.5cmx9.5cm and the full nail patterns measure 2.5cmx2cm. All patterns and designs are sized to fit on both, short or long nails. 

***You can also watch this awesome video review of the plates by Lacquer or Leave Her!


 ♥♥Thank you so much for reading♥♥

Nails Designs

Beautiful, provocative and long nails are the dream of many women. But, not all of them are bestowed with such nails. A few women may not succeed in growing their nails as desired by them, however hard they try. They may try a number of manicures but all their efforts may go a waste. A few others may grow their nails to the desired extent but these nails may suddenly break due to various reasons and demolish their dreams. For a few others, the nails may be weak and brittle and hence, may break. In this context, the best solution is to go for acrylic nail designs to have the desired makeover. Beauty salons offer this service and ladies can achieve their goal of having long, beautiful and impeccable nails.

Nails Designs


Having acrylic nails is an easy process and the procedure can be carried out very quickly. There are no hassles like attempting to grow nails naturally. You can have the length or designs you desire to have. Every woman will have a few designs in mind and these can be painted on the surface of the nails.

Another great feature about these acrylic nails is that they are quite durable. The beautician will glue these artificial nails to your natural nails. But, it is not necessary that the processes involved in this should be done only at a beauty salon. They can be done at home also. There is a special glue that is required for carrying out these processes. Various nail designs can be painted on them after they are glued. These designs will make your nails highly glamorous and beautiful. These are many acrylic nail design ideas and you should choose the most appropriate ones that suit your tastes. But, while removing the acrylic nails, you should be very much careful. The fact of the matter is that nail care becomes highly important when artificial nails are opted for.


The popularity of acrylic nails stems from the fact that they are long-lasting and affordable and add beauty to your nails. Beauticians and experts are doing a lot of innovation in this concept and therefore, day in and day out, many new and breathtaking designs are being developed. So, women are also keeping abreast of all these developments. Many fashion-minded women are opting for the hot trends in these designs. This makes the task of the beauticians all the more challenging. They have to cater to the unrelenting expectations of their customers. So, they are also forced to update their knowledge in this concept to provide the right solutions to the requirements of these women.

As in the case of all fashionable things, a few women opt for simple designs, a few others wish to have complicated nail art designs and so on. Simply put, all these women wish to grab the attention of others by having such beautiful acrylic nail designs. There are many nail art products such as acrylic paint, glitter, crushed seashells, rhinestones, lace, stickers, acrylic 3D details and the list is endless. In general, a well-carried out manicure should last up to 4 weeks.

Nail Art Designs

Getting Gel Nails is the perfect way to dress up your hands. Whether you work with your hands each day where everyone can see them, have a special occasion coming up, or you just want to pamper yourself. Your hands are an extension of yourself and your style and for many women it is necessary to make sure that their nails are in top condition. You will want to explore the options that gel nails can give you before you make any decisions or head to the salon for your appointment.

Nail Art Designs


Gel nail can be light cured or no-light gels. The difference between the two types of nail applications is essentially the light used in setting the gel to your nails. Light cured gel nails are typically the more popular style and are commonly used in a number of salons today. The gel is premixed and once applied to the nail you must sit your hands under an ultraviolet light in order for the gel to set properly.


Those who wish to obtain no-light gel nails will have the gel applied to their nails and a specialized gel activator can be brushed or sprayed over the gel nail in order to set them. Some estheticians even use plain water for setting gel nails. If you have any questions about the type or application, be sure to ask your esthetician beforehand.

There are many positive aspects of getting gel nails over acrylic or other types of nails when looking at different procedures. As it tend to look more glossy and natural than other styles of applications and do not require a great deal of time to cure.


The gel mixture is practically odorless and there can be less filling time required as opposed to acrylic nails. Some negative aspects may not be important to you and will depend on what your procedure for daily nail care is.

Nail applications are typically harder to do at home yourself and should be done by a professional to be properly completed. The gel cannot be soaked off your nail and must be filed off if you wish to remove them. Depending on your daily routine, it may not last as long as other types of nails such as acrylic so you will want to ask your esthetician which one is best for you.


Once you receive your new gel nails, you can treat yourself to some nail art or accessories if you wish. Painted designs, stickers and even fancy polish are great ways to add a personal touch to your new gel nails. Ask your stylist if they specialize in any nail art design or what they offer for special nail treatments when you are at your next nail appointment.

Coordinating colors for an upcoming big day can be the finishing touch for your nails with that perfect dress, or a simple painted design on one of your nails can give you the personal edge you are looking for.

Nail Polish

Gel nail polishes create a very sturdy protection compared to other polishes and hardly ever chip off. These new gel polishes are not exactly uv gel nails and not exactly nail polish, they are kind of a hybrid between the two. Shellac is one brand name and Geleration is another. Applying a gel polish properly requires using an ultraviolet or UV light to cure every single layer. These hybrid gel polishes are great to ease a client into the idea of uv gel and the benefits provided. If one wants to remove the polish, a polish remover is needed and one must soak it there for quite a few minutes in order to take it off. I believe this is one of the greatest draw backs of the gel polishes, but the benefits are many.

Nail Polish


There are a few other disadvantages to gel nail polish. They are high-priced compared to a regular manicure, because the cost of the gel polish and the UV lamp have to be considered. They are not as sturdy as a full gel nail tip, or an acrylic for that matter. they do however last for 2 to 3 weeks without chipping. If your client gets tired of the color, they can also be painted over with regular polish. This really helps to offset the cost of the gel polish manicure, because a manicure is not needed as often. Sometimes, they do fail one's expectations. The application and removal should be done by professionals. One can do it on their own but be sure that one is full of the proper knowledge in applying gel polishes. When the nails split or break, they have the tendency to blow apart. Due to this, one cannot fix it alone. One will be forced to go to a salon and have it fixed there or replaced.


Just like any other artificial nails, most especially the acrylic nails, there is a peril and a chance to develop and catch a fungal infection after and during the application procedures. So, it is important to clean one's cuticles, and the nail bed. Better to use alcohol or disinfectant before the application of the artificial nails. Taking care of the nails is a must. As well as taking care of one's fake nails is extremely vital. Be sure to moisturize the cuticles once in a while and get the nails filed often. Proper maintenance is necessary.


There are also advantages in choosing gel nails from acrylic artificial nails. One of the considerable advantages of having gel nail polish is that they look just like the natural nails. Those gel nails appear to be thin and with a glossy look. The special glue used to let it stick onto the nails is absolutely odorless that's why it is safe for everyone.

To get some more insight into how gel polish works and to learn a little bit more about the different gel nail products that are out there, you should probably check out this gel nail blog and browse around a bit to be more aware of the fastest growing trend in the fashion industry.


Who doesn't like to use nail polish these days? The problem lies with incorrect application! I've seen so many nails that are unevenly coated, cracked and chipped. We can easily prevent these things from happening if we all learn how to apply nail polish properly! Follow this quick guide when you are applying polish to your finger and toe nails next time and I'll guarantee you'll see an improvement to your nails!

Before you start applying the polish to your nails, you'll need to select the right color. My first advice is to use a color that you actually like and not follow any rules of thumb regarding color choice. Having said that there are some guidelines to choosing the right colors that I typically do follow. The first is where are you heading to? What is the occasion? If it's for everyday coverage, neutral tones are good to go. These are perfect for work days and professional events. If it's a more relaxed and fun event, go for whatever you like. Matching with lip color and the colors you are planning to dress in is also a good idea. But again, the best is to trust your instincts and go with colors that you actually like. My personal favorite are chrome colors to give my nails that sexy shine.